For the last five months, Cricut has hosted the Design Space Challenge. Tons of bloggers created projects with their Cricut Explore and submitted them for voting. After five rounds of competition and hundreds of entries, we are down to five bloggers vying for a $10,0o0 cash prize. That’s some serious shekels, friends. I made it into this final round of competition with my Print Then Cut Cookie Exchange Party…then came the fun part. Exactly two weeks after having a baby, I received an email from Cricut stating that I’d made it into the final round of the Design Space Star competition. I remember it very well. I was sitting on the couch with the baby. My mom was sitting next to me. I read the email and immediately had a huge smile on my face. I looked at my mom and said “I’m in a contest to win $10,000!” My next thought…”How the hell am I gonna do this…all with a baby who’s developed quite the breastmilk habit?!” There was a lot of excitement, worry, fear and confusion at that moment.
I am nothing if not persistent, people. So I got to work. I could make this happen…and I did. Here’s a rundown of our assignment:
- Use the Cricut Explore to transform a space in your home
- The transformation should be “dramatic”
- You have a budget of $1,000 plus access to whatever Cricut supplies you need
- Use the Cricut Explore in unique & different ways
- Create an accompanying video that showcases your space in whatever way you wish
- Feed your baby every 2-3 hours and keep him happy (…well, so that wasn’t in the actual rules, but ya know…it sort of went without saying)
![]()
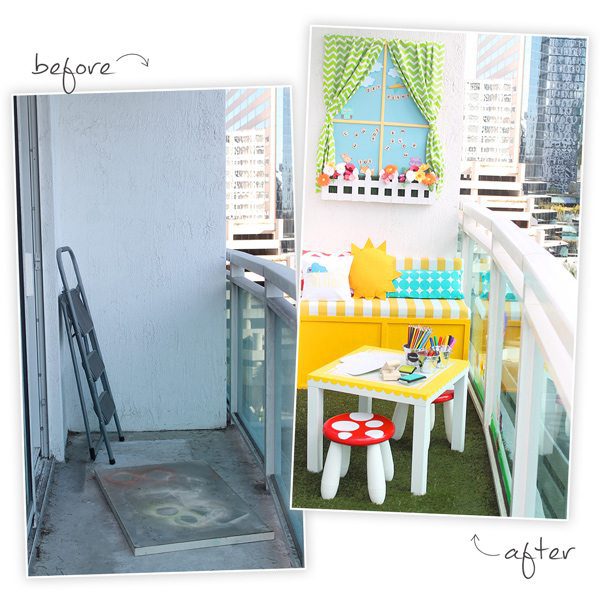
I went back and forth about what space I would revamp. First, I thought I’d give our master bedroom a makeover but I quickly gave that one the kibosh when I realized that I’d have to sew a new duvet…which is a skill that this girl does not have. Then I considered the master bathroom…I’m sure you’ll thank me for not going that route. Then I started thinking “outside” the box…quite literally. The balcony outside of Markus’ room was in major need of attention. It was gross. Here’ the proof: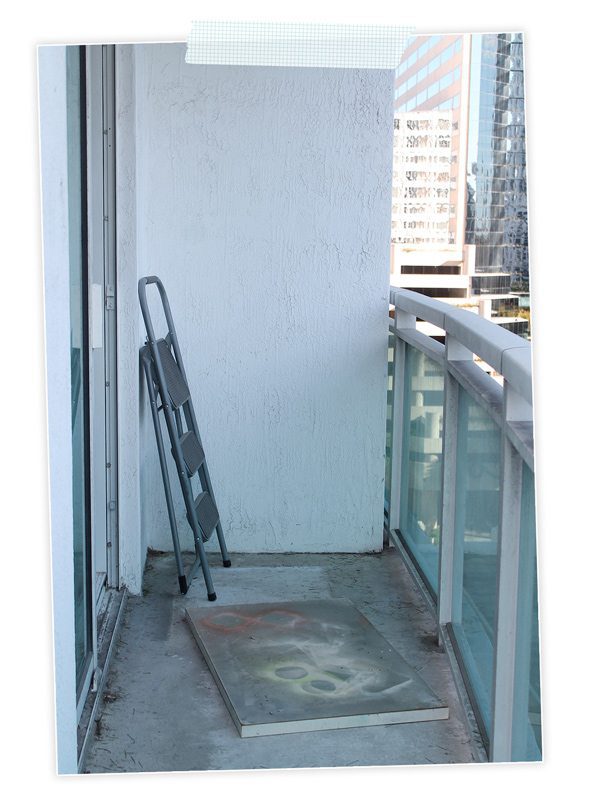 It was empty, dirty and home to a few random items including an old table top that I used for spray painting small objects. The good news: it was a blank slate. The bad news: it was a blank slate. I could transform this in anyway I wanted, but I had to start from scratch. There was nothing to salvage – nothing to repurpose.
Here’s a rundown of my mission:
- Take the balcony from “Crackhouse in the Sky” to “Playhouse in the Sky”
- Use the Cricut Explore in as many ways as I can, with a variety of materials
- Create a colorful, child-friendly play space with interactive play elements and home decor items
- Create doable DIY’s that could be accomplished on my newly busy schedule.
- Feed the baby every 2-3 hours and keep him happy
With lots of support from my mom and husband, I made it happen.
![]()
First up – a little moving picture action filmed, produced, edited and directed by your’s truly. Watch out Tarantino – I’m coming for you … and I’m pretty sure you have absolutely nothing to worry about.
[ylwm_vimeo height=”400″ width=”600″ ]117609366[/ylwm_vimeo]
Now, let’s take a closer look at each element of this “Playroom in the Sky”
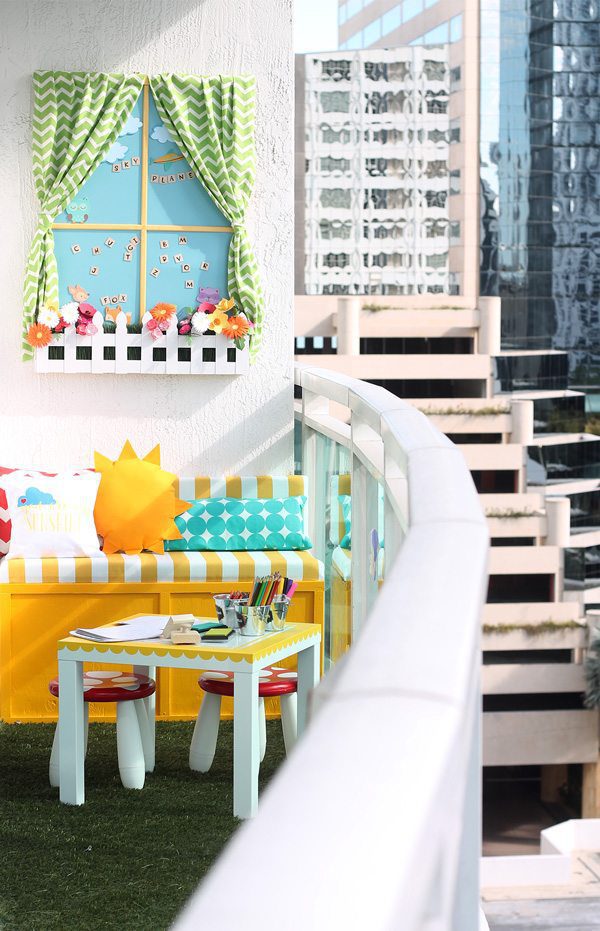 Miami winters are beautiful and offer the perfect excuse for outdoor projects like this. The cool temperature means that you can spend hours outside without sweating your eyeballs out. This outdoor playroom is paradise for any kiddo and is a great way to celebrate a comfortable winter and welcome spring. As always, I kept the colors bold and bright and filled this space with tons of projects that will keep any child occupied for hours.
![]()
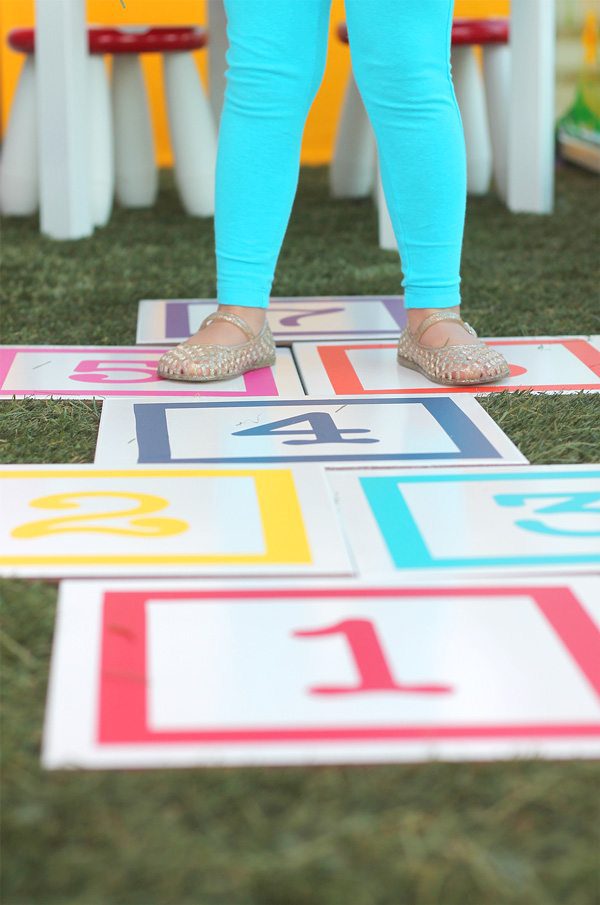
hard to choose a favorite, but this floor tile hopscotch may just be it. This was an 11th hour addition to the playroom and I’m so so happy I squeezed it in. I took 12×12 porcelain floor tiles and added colorful framed numbers to each one. The project took me less than thirty minutes to create, but it has a huge impact!
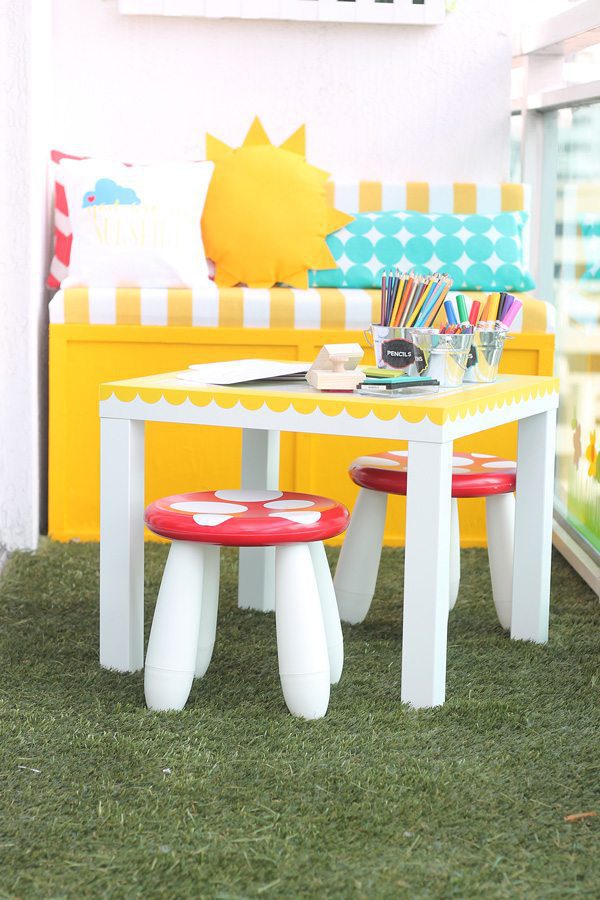 An adorable table and chair set are the anchors of this outdoor playroom – and you will love how easy and affordable they are to create. The Lack table and Mammut children’s stools are both incredibly easy to DIY. I spray painted the tops of the stools with my favorite red spray paint then added white vinyl circles cut in various sizes. The result? “Toad”stools! Get it? Toadstools. Did you just die?
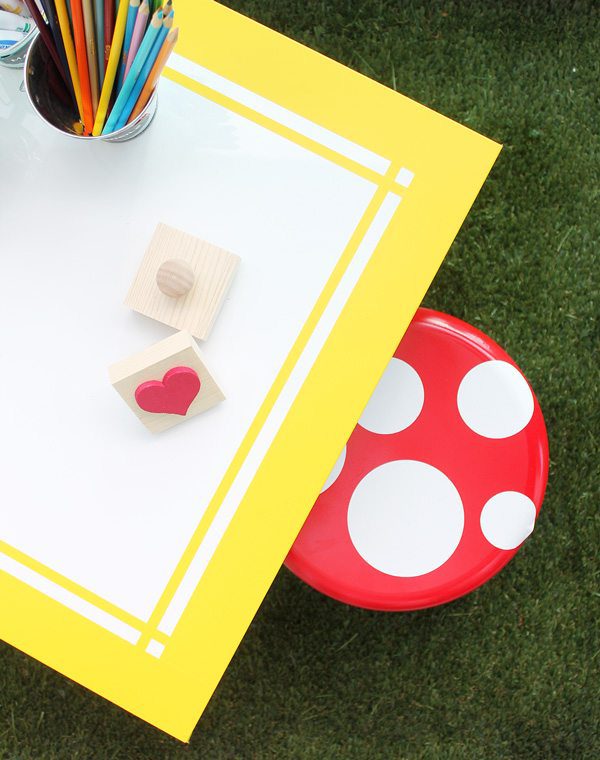
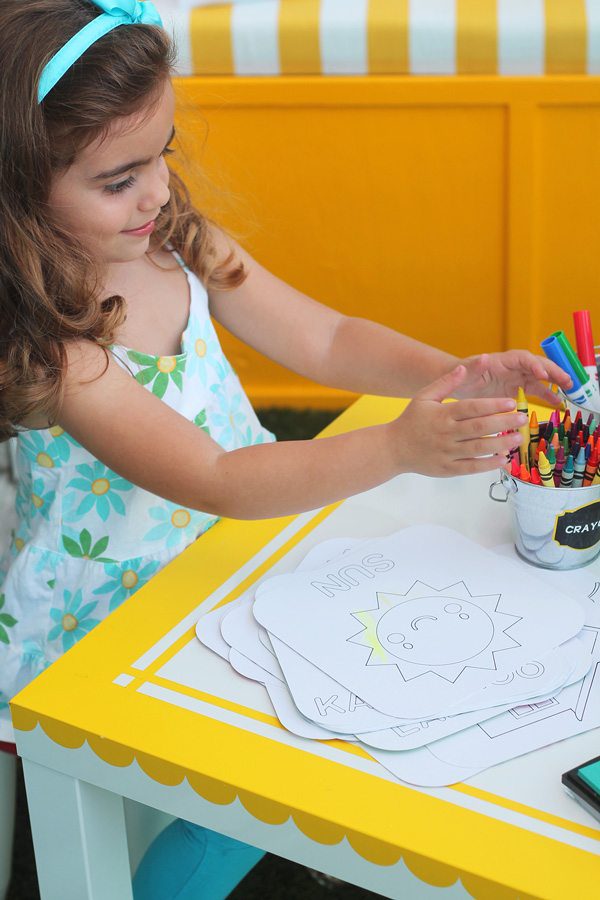
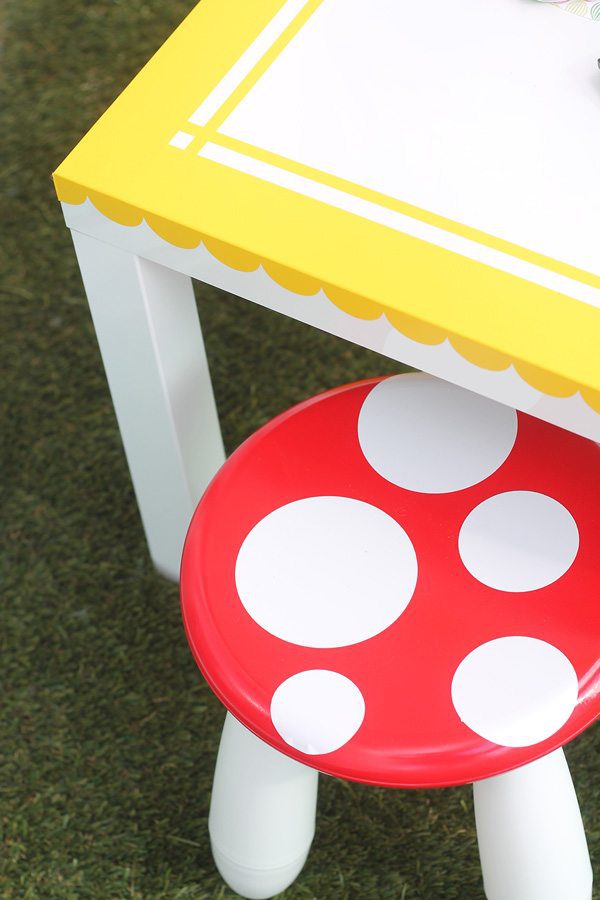 I dressed up the table with scalloped strips of yellow vinyl that I placed around the edges and thin straight strips that I applied to the top for a simple criss-cross pattern. With the table done, I filled it up with supplies that will spark creativity. Every playroom needs something to play with, right?
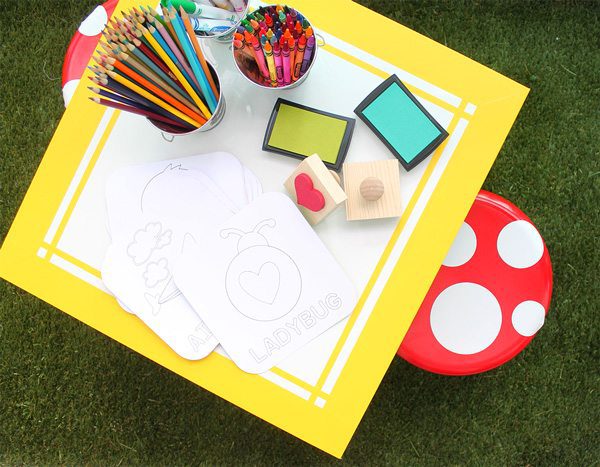 Since the Cricut Explore has a writing function, I decided to put it to work and create a full collection of alphabet coloring cards. I used images from the Design Space Library and created written outlines by selecting the “Write” option on the Layers panel. Very easy to do and a great activity for itty bitty hands.
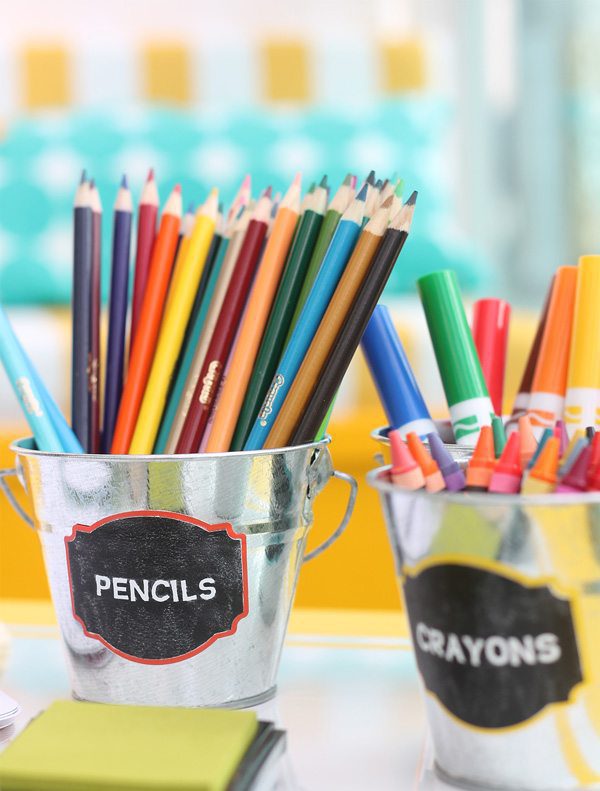
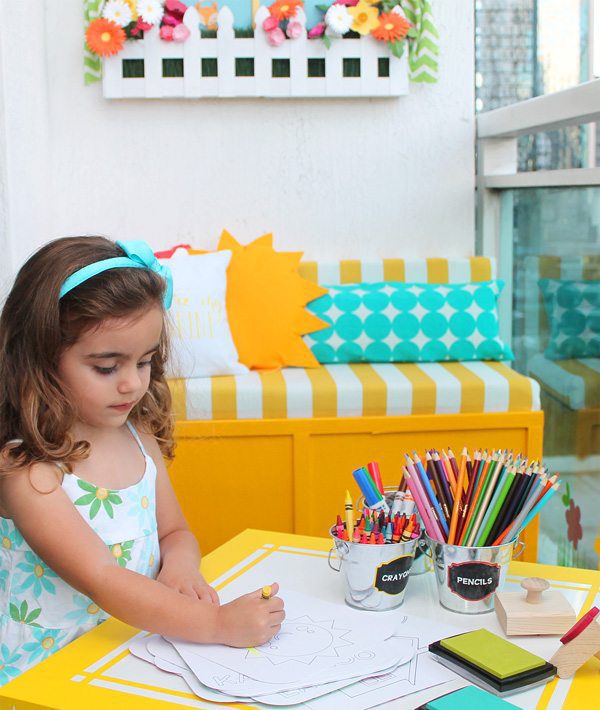 Organization is a must so simple galvanized buckets got a quick makeover with labels that I created with three layers of vinyl. Since vinyl will easily stick to itself, I layered chalkboard vinyl onto a slightly larger background and rubbed on some chalk to give it an authentic feel. Last, I adhered white vinyl words to each label for the look of chalk on a chalkboard.
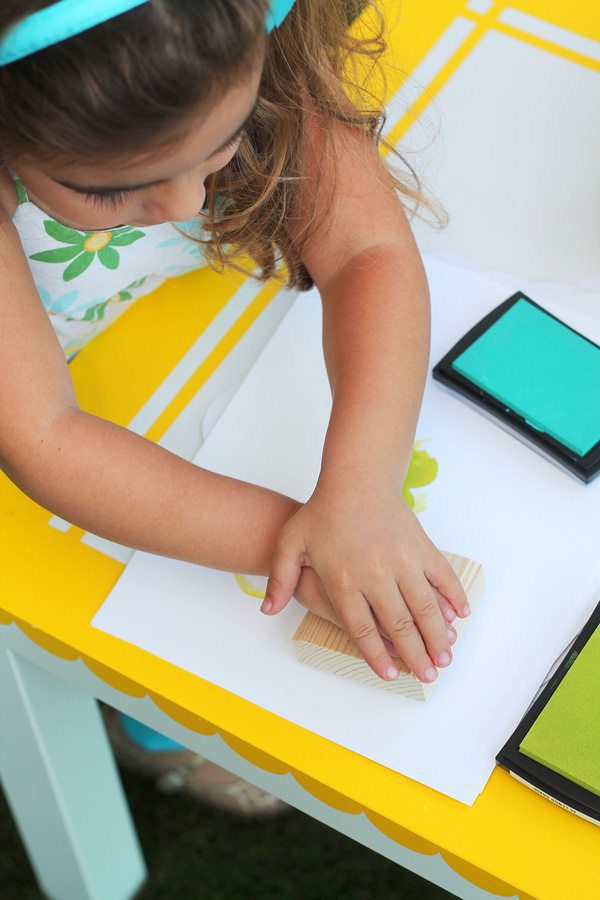
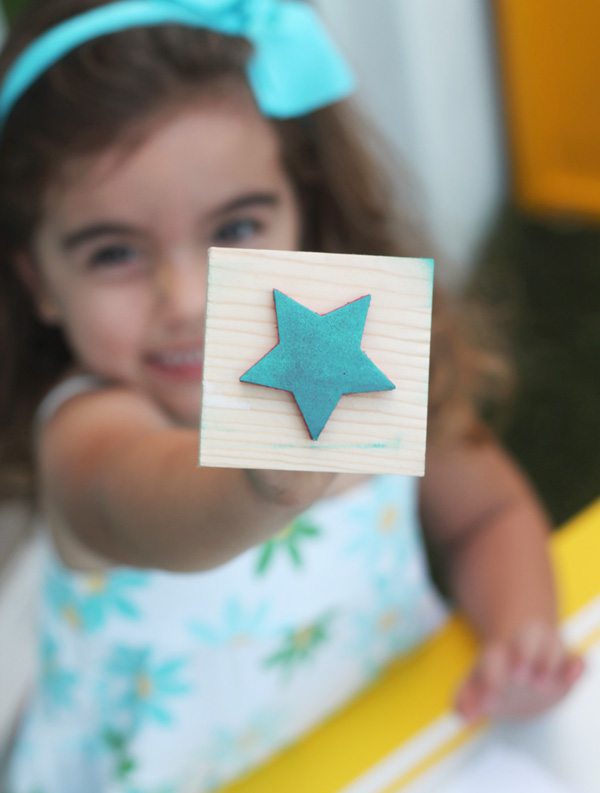
 With my love of stamping, I created a couple stamps with the Explore. You’ll love how easy this is:
 The Cricut Explore has a setting for cutting craft foam, so I went to work cutting out a few basic shapes from red foam. Next, I adhered the foam to small wood blocks and added a knob handle. Instant stamps that your kids will love.
 Now for what is perhaps the most shocking element of this playroom project – I built something! That’s right. I busted out the drill and constructed a storage bench. I wanted to create functional adult-sized seating for this outdoor play area. This way, the grown-ups can comfortably supervise while the kids have fun and stay safe…and maybe those adults can grab a coloring page and join in on the creativity!
The whole storage bench thing was touch and go there for a while – and for a period of time my bench resembled a coffin. In the end, it worked out and I’m pretty damned impressed with myself. Not gonna lie.
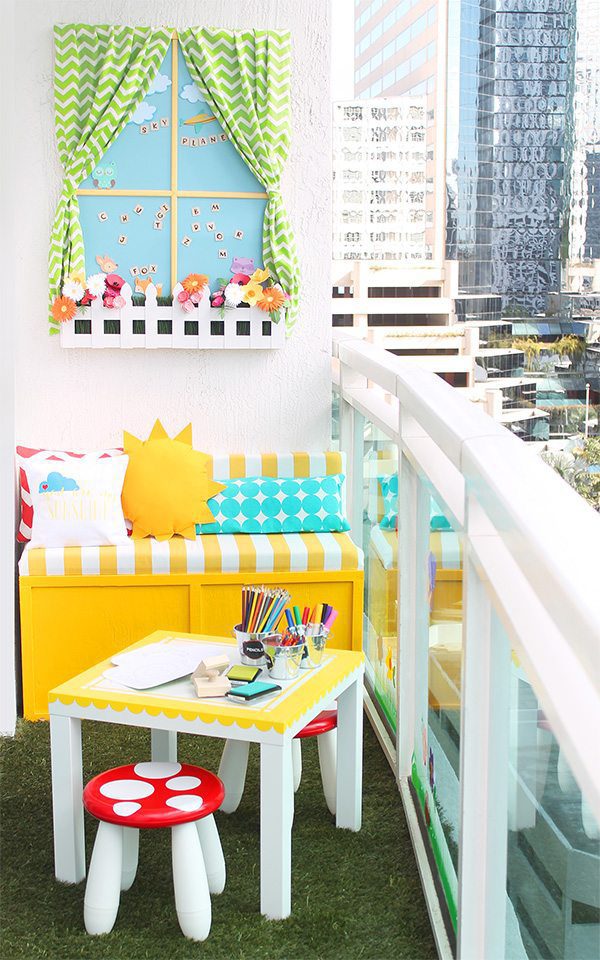 I slapped a hefty coat of paint on it and let it shine as a great place to plant your tuchus. I dressed up the bench with fabric covered padding and added some handmade pillows.
 The “You are my sunshine” pillow is nothing more than a few strategically arranged iron-on cuts. To achieve the heart inside the cloud, I simply ironed on the red heart first, then placed the cloud so that it fit perfectly around it. To accompany this saying, it only made sense that I have a sun-shaped pillow which I created with a round pillow form surrounded by triangles cut with the Cricut Explore.
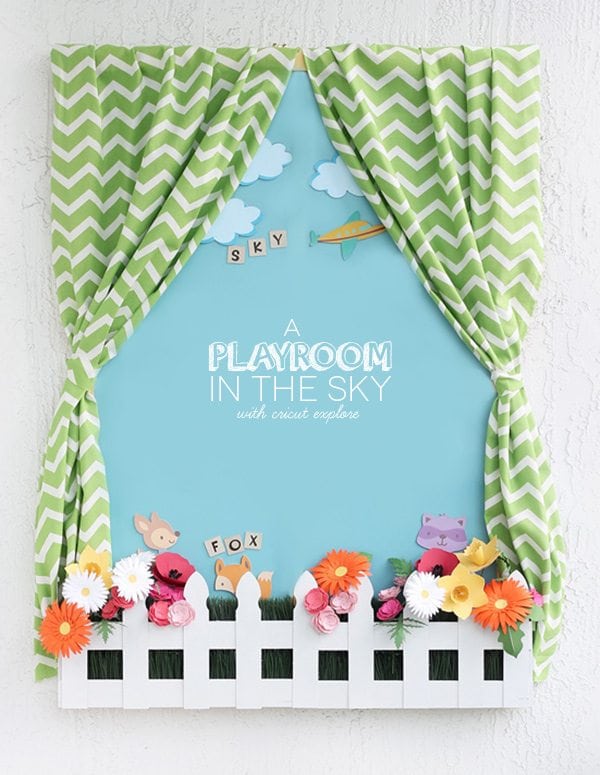
Above the bench hangs a “window” which really drives home the playful outdoor feel of this room…and did I mention that it’s a fully magnetic learning board!?
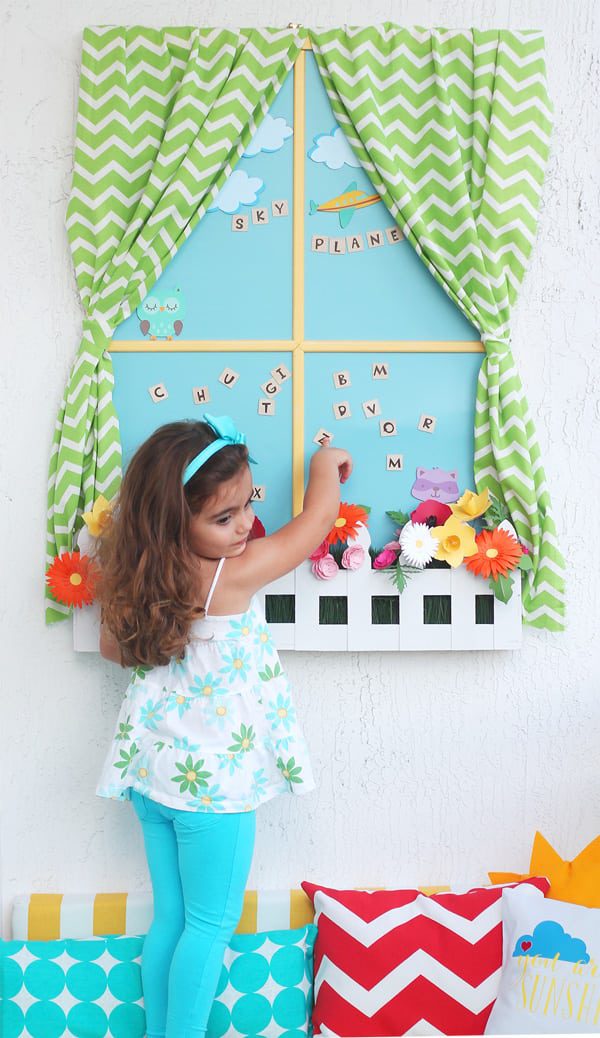 The “window” is constructed with a 24×36″ metal sheet placed into a poster frame. I covered the metal sheet with Sky vinyl, then added strips of wood across the front to mimic the look of a real window. The interactive elements of the window include birch wood that I cut into squares and added vinyl letters to make spelling fun, as well as Print Then Cut animal, cloud and airplane shapes. Then of course, there’s that awesome paper garden and window box…
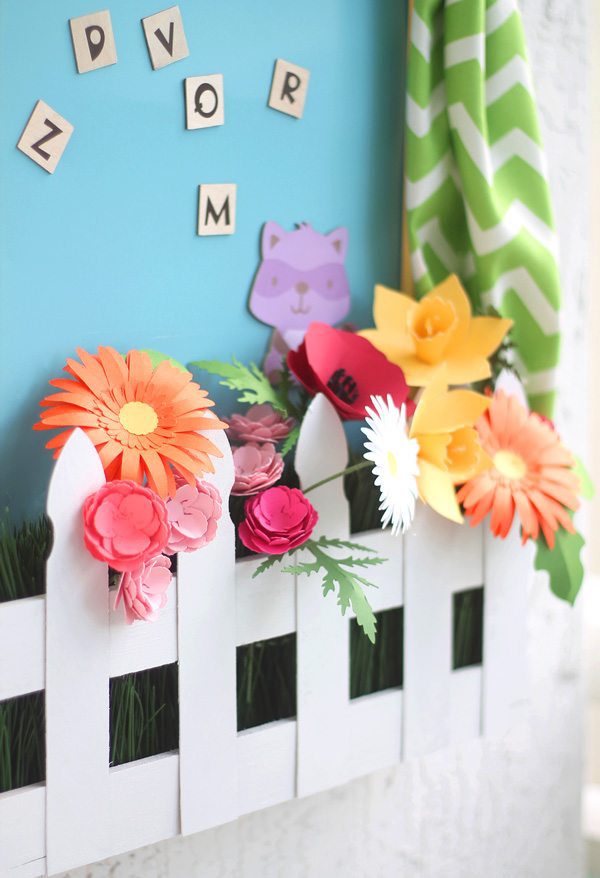 To create the window box, I cut birch sheets in the shape of fence posts then adhered the fence posts to a premade wooden crate. A little white spray paint finished it up. I filled the window box with faux grass and paper flowers that were all cut from images in Design Space. The faux-garden fun doesn’t stop there, though…
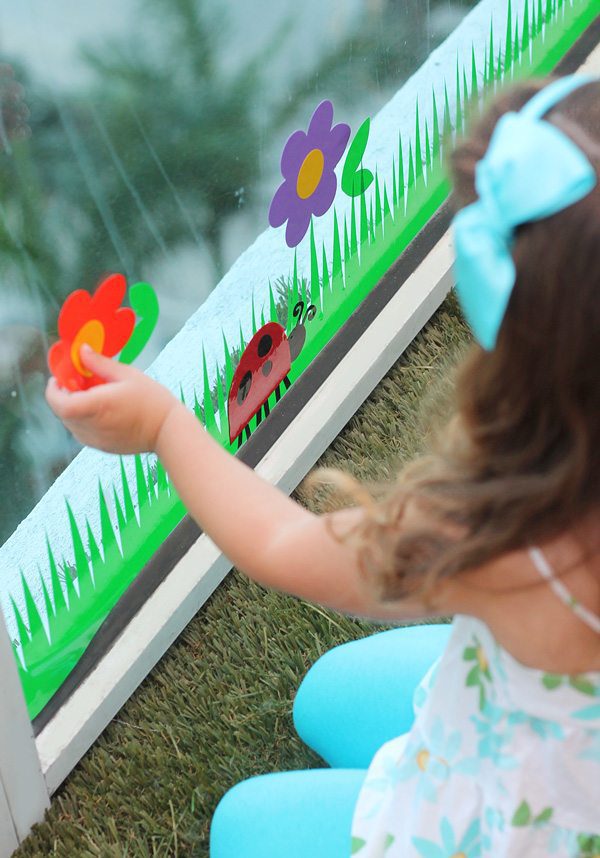
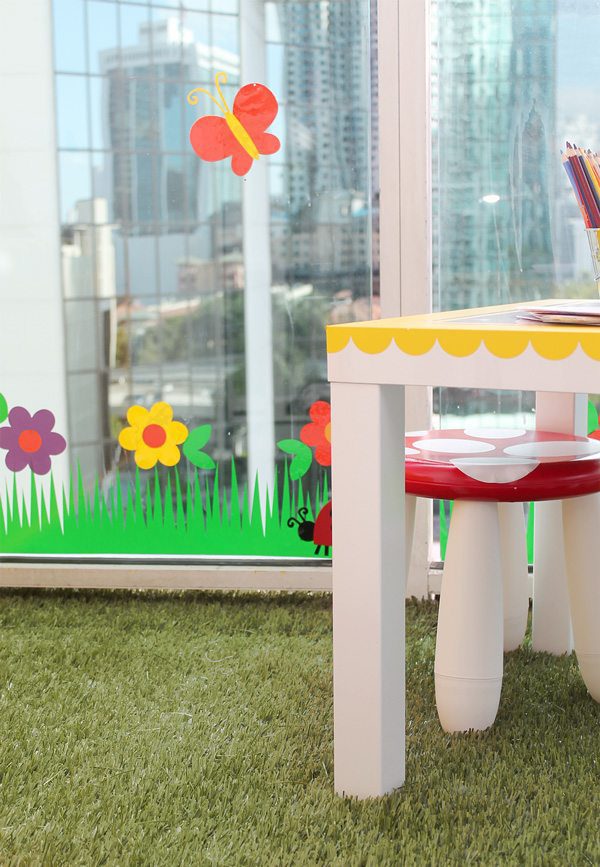 I added a cling garden along the balcony windows as a final touch. The window cling material is really easy to work with and very forgiving. You can take it off and put it back as many times as you need until you get the perfect placement…and if it loses a bit of it’s “sticky power” just run the cling material under water and let it dry. BTW, how cute is that little lady bug peeking out?
So that does it! Are you still with me? Here’s a side by side of this playroom. Wanna come over and play?
If you love what you’ve seen, you can head over and VOTE for this project.! Voting is open until Friday, February 7 and you can vote once each day! Click HERE to visit the voting page and be sure to cast your vote for Damask Love.
![]() Now for the damage. To stay accountable and show you the rundown of how I spent my $1,000 budget, I’m giving you a look at my “receipt.”
Now for the damage. To stay accountable and show you the rundown of how I spent my $1,000 budget, I’m giving you a look at my “receipt.”
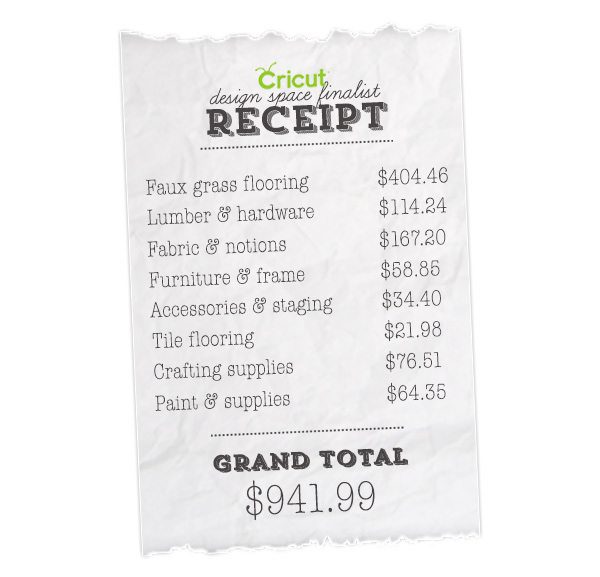 The faux grass flooring was, by far, my largest expense which means that you can easily tackle this playroom project on the INSIDE of your home where grass flooring probably isn’t needed. Additionally, if you already own hardware items, paint supplies and extra fabric, you’ll be able to pull this off for a lot less that I did.
I hope this Playroom in the Sky gives you lots of creative ideas that you can use for an outdoor or indoor playroom You certainly don’t need to make everything you see, but maybe, just maybe, you can bring a bit of the outdoors in with a project or two. Thanks so much for scrolling through this massive post and I hope you’ll send a vote my way!
In the meantime, I’d love, love, love to hear your thoughts! Which project is your favorite?

this is so cute! you did an amazing job, especially considering you have a new baby.
you certainly have my vote.
Amazing transformation– love, love, love your garden in the sky– what a happy place! And it’s only the beginning– as your own little guy starts to play out there so many more wonderful ideas will come to life… (I could see sharks and whales swimming on your balcony window…) And I love that your bench is for sitting on, maybe resting on, and definitely for standing on– yay for furniture that’s OK to climb on!!! What a work of love and inspiration– you’ve got my vote!
I have no words…. ok, maybe a few!! You have inspired me so much to get busy with my Cricut Explore – can’t believe you did so many wonderful things! You have my vote too xxx
I think my favorite is the storage bench with the ridiculously cute pillows 🙂 Everything is amazing though! You definitely have my vote.
This is a WOW. Exceptionally creative with a great eye for detail. How can you not win….
Great job! You have my vote!
OMG I love the amazing transformation that you can do with Cricut Explore and wonderful ideas like this one. Beautiful work!!
This is absolutely AMAZING! I love how you used the explore for the stamps and birch wood on the window. My favorite is the flower garden. It’s so cute! This looks like something out of a magazine. Can’t wait to start voting.
Wow! You did a fantastic job on everything. And with a new baby. You NEED a Queen of Everything t-shirt. For real. I would love to see you on HGTV. I would watch every show you made. Good Luck, you definitely have my vote with the Cricut contest……
You did a fabulous job, Amber! And with a new baby, too! My favorite is the cute little table and stools. I will be casing this for my granddaughter.
You did an amazing job with this space! My favorite element is the artificial grass. Good luck in the competition!
Wow, what an amazing job! I know you are the winner!!! Good luck!
No doubt in my mind – you will WIN this. It is so happy and beautiful.
This is absolutely adorable! I love the use of the whole space.
I am speechless. You are amazing. I do not have a new baby and I couldn’t imagine getting all of this done.
This project will be hard to beat! It is wonderful! I love the hopscotch tiles and the adorable table and chairs. The colors you chose are bright and delightful. Best of luck. Hoping you win the money!
AMAZING!!! OMG, that is over the top! You just kept pushing that creativity to the edge. And with a new baby-you’re an inspiration! (and I’m 62!!) Every little detail is so adorable, yet functional for a play area.
Wow! I love everything you create, but this is, by far, the most spectacular creation, yet! I love it! And, then, you went and made that fantastic video to go along with it. I don’t know who else is in the running for the big prize, but I can’t imagine anyone coming up with anything to top this! Good luck! I hope you win!!!
Hi Amber, This is absolutely SPECTACULAR and AMAZING! I don’t know how you managed to do this with a new baby. I remember my first baby and I was so sleep deprived and hormonal that most of the time was spent crying (both me and the baby). So the fact you could do such an incredible project is a testament to your artistic ability, creativity, ingenuity and fabulousness! You are awesome! You will win this! Congrats on your new baby also! Hugs, Joy
Spectacular transformation!!! You rock!!!
If you could bottle up a bit of your energy and send it my way…
Amber,
You are amazingly talented. You have an eye that is out of this world. GREAT WORK!
This is seriously awesome! I think the price isn’t bad, like you said if done on an inside room, it doesn’t need the artificial grass. But, explain to me how do you have a head to work on this, with how busy you’ve been lately! You really need to give us tips on time management and organization. This is lovely I wish you the best!!!
Amber, I love, love this project.
That would be a great playroom when our grandkids visit. I’ll be voting for you.
If you aren’t the winner, your a winner with me!
Wow this is amazing…I Love reading your blog posts, so full of ideas! and you’re really funny 😀
This is a winner for me!! Goodluck!
Unbelievable! It’s absolutely amazing! And such a great use of space. Your creativity never ceases to amaze me. Good Luck! You have my vote for the win!
HOT DAMN GIRL!!! I am in such Awe… I Seriously want to come over and see this with my own TWO Eyes! I can be there in 20min.
This is ABSOLUTELY GORGEOUS!!!
YOU WIN…YOU WIN…YOU WIN!!!!
***** HANDS DOWN …AND UP *****
I Love every single detail and your Video certainly is creative and on point. What better setting to do this in than our Beautiful city in the MIA. (It’s not bragging when it’s True)
I’m rooting for the Home Team!! I don’t know what the other finalist did, but Gurl..friend, I’m sending you a Hive “5”, Kunckle Bumps, Two-Snaps Up and a Honey Chile’ Whoop dare’ it is…Boom Shakka Lakka!
Let’s make a play date…is your ham into older girls…LOL. I’m sure my 13mo can be persuaded…lmbo. BRAVO BRAVO BRAVO!!! Go Amber, Go Amber…
(pssst, I have a little 5yr old’s room you can make over anytime)
Oh Amber, this is amazing! Looks like such a fun and happy place to spend time for both parent and child! Good luck!
Super fun, cute, and amazing! You nailed it, girl! 🙂
Holy $&@! This is fantastic!
OMG! ADORABLE!!!
Love, love, love it!! You did such a fantastic job. Very creative. I love all the interactive activities to explore!
Amber–you are simply amazing! I want to live on that balcony! I first started following you when you re-purposed your other balcony, and have marveled at your talent, creativity, wonderful eye, and never-ending energy ever since. This was such a great idea to start with, then your attention to detail made it extraordinary! From the Sun shaped pillows, to the curtains on the magnetic “window” board, to the toad stools, the yellow accents on the white table, stamps and coloring pages, tags on the little buckets–all so perfect. I love the interactive cling garden (which may be turned into a contraction site or an underwater exploratorium by Markus one day). But that is the best thing about this space–it can grow with him! And the video and photos are wonderful. You just produced an amazingly professional and polished video/ commercial for Cricut–i think i heed to have one now! I’m sure you’ve got this–I’ll be voting for you! Thank you for sharing this and for your entertaining blog. It always makes me smile!!
This is absolutely genius and so worthy of a first prize win! Love how detailed and creative you are. Magnetic window, window clings and toadstools?! You are just too cute for words, and so is your sweet little model! Just Brillant Amber, Brillant! Can’t wait to vote.
That is an awesome transformation, I love the cheerful mood and fun space you created!
I just read this whole post word for word and I don’t like to read. lol You have a GIFT! I am amazed at how you can look at a blank space and create such an adorable playroom! Every detail is fantastic! I think it was great how you showed the different materials you can cut with the Cricut Explore and all the different things you can create with it. Your video was perfect – I thought I was watching a Cricut Explore commercial. All of your projects are so creative but this one… What can I say? Simply Outstanding!!! You definitely have my vote!
You always continue to amaze all of us. Love, love, love this transformation!
I absolutely LOVE this project!! So many cute and easy projects to inspire and replicate and you got it all done with a newborn!! Way to go, momma!
Love your project….love all the colors
This is an amazing and creative project,
Amber!! I love it and your great sense of humor. I would have been impressed with the results even if you weren’t also caring for a newborn baby but that fact is also impressive. I can’t imagine a project that could top yours; I truly hope you win!!
OMG Amber! You knocked this out of the park! It’s brillant, I had to go back for a second helping. So damn cute! Oh, and your model…adorable!
This is just fabulous. I could never imagine that that sad little balcony could become an amazing play area. Wow!
This is SO insanely cute!! Great job
This should blow it out of the water!!! You designed a wonderful space. It’s colorful, beautiful and has a purpose! Love!
Well done, Amber – this is amazing! A-MA-ZING!!!!
I hope you win!!!! You are sooooooo creative!
What an amazing transformation! I love everything you did, the colors and the way you followed through with your theme. I cannot wait to vote for you. Thank you for sharing your talents with all of us.
WOW!!!!!! absolutely wonderful, Amber!!!!!!! just WOW!!!!!! girl, you got my vote!!!
WOW Ashley!
An amazing, adorable space for anyone, let alone a new Mom!
You are fabulously creative and obviously still full of your signature energy and style!
I hope you win! You deserve it!
Thanks for sharing
Susan
Sory Amber, I know your name! I was apparently distracted!
Please accept my apology
Susan
Wow amazing transformation!! I definitely can’t pick just one project I like – because they really are all fabulous! The entire space is so bright and cheerful, wonderful job!!