Necessity is the mother of invention.
And, wedding planning is the mother of necessity.
With only a month or so until our wedding, I’ve had to dial back my crafting spending to, well, zero…and it’s killing me! It seems that with this spending restriction, my wishlist has grown ten-fold with no hopes of being filled – that’s where the “invention” part comes in!
You see, today is the day that Papertrey Ink releases new product and there are oh so many things I’d like to purchase – and at the top of my wishlist is their new set of Card Base-ics dies. (If you haven’t seen them, just take a trip to Nichole Heady’s blog where she’s posted all the new product).
Anywho, as soon as I saw these dies during their release, I knew I needed them! Of course, I am using the term “need” very loosely here, since I need more crafting supplies about as much as I need another pair of shoes or a hole in my head! Whether I need them or not though, it’s not gonna happen, so I got inventive and created my own Card Base-ics – which worked out swimmingly if I do say so myself!
Using the partial-die cutting technique that I shared in THIS post a couple of days ago, it was quite easy to recreate the look of this die – and quite frankly, I think that the DIY version is far more versatile…but you can be the judge.
First I’ll share with you my strategy for creating this die:
The main technique is the same as in the other partial die cutting project I did. You’ll want to let your die hang off the edge of the cutting plate with only the part you want cut resting between the plates of your manual die cutting machine.
For this card though, you’ll need to be sure that the die cuts are evenly spaced so that a smaller card can fit between. For my purposes, I knew I wanted to have a little gift card nestled in the flaps.

First, I created a mini card that was perfectly sized for a gift card. The dimensions of the mini card are 3.5″ x 2.5″. Then, with the mini card done, I took my card base and drew lines on either side to show where I’d like the die cuts to go.

These lines served as my guide for where the cut should stop. So, when I placed the card base in the die cutting machine, with the die on top, everything below the line hung off the edge of the plate and therefore did not get cut.

The finished product contains two die cuts within the cardstock that are perfectly spaced for placing a card in between!
I hope this instructions make sense – but if not, perhaps it will help to see the projects I created with this technique!
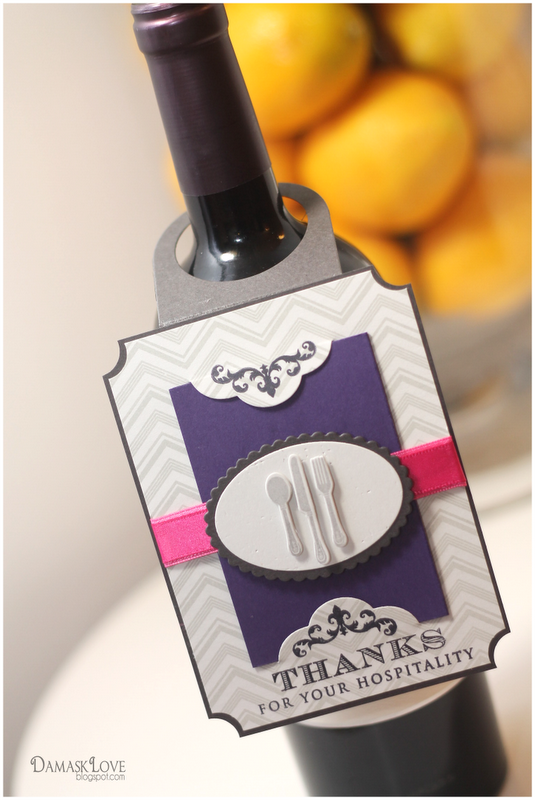
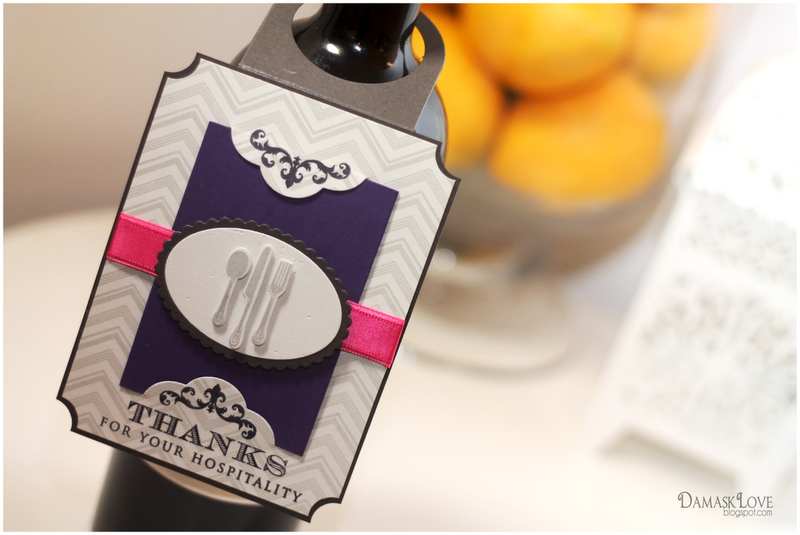
First up is a bottle tag project I made using the Papertrey Ink Half & Half dies for creating the flaps.
It’s always appropriate to bring a gift when you’re invited to dinner with this design, you can include a little gift card for the hostess, too!
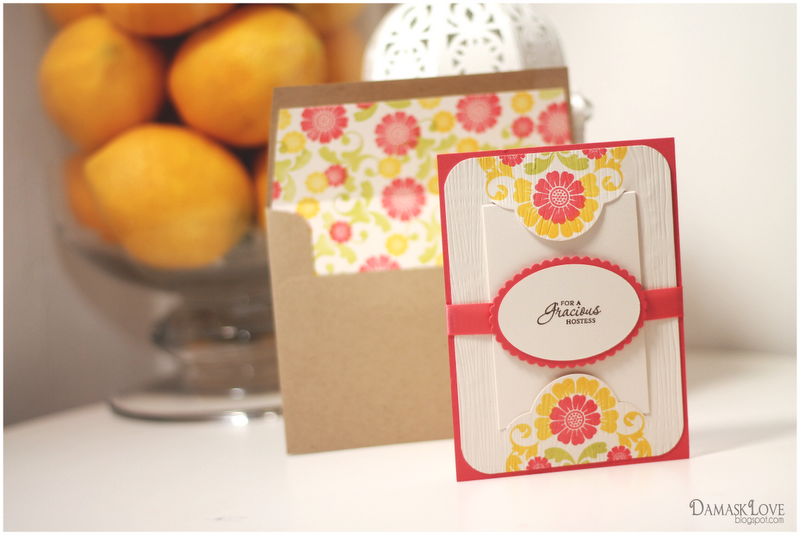
For my second DIY Card Base-ics project, I used Papertrey’s Mat Stack 5 Die.


wow Amber, that was brilliant and so pretty!
You know I did the same thing when PTI released the wine tag die and then it was out of stock– and I’ve been sooooo happy with all the ones I’ve made since then (b/c just like this post the reality is that we all have the tools to re-create if we think outside the box). LOVE THIS…. and now I’ve got so many ideas of how to customize the card base-ics with a whole bunch of dies, thanks!
Can I give you a hug? This is a brillant Amber! I thought about it too. Money saved for other items on the wishlist 🙂
I want to try it out tomorrow. Your projects are beautiful as always 🙂
You are absolutely brilliant!
Girl, you are amazing! You just saved me $14! 🙂
I’m kind of in love with you right now *leaves to try this out right away*
Thanks for this! All week I’ve been thinking “I know I can make that with what I have” whenever I saw it mentioned on Nichole’s blog!
Brilliant!..I have also tried it with my Mat Stack 3 die and Half and Half die, will try and post it on my blog today!
you did a great job with the intructions!
You never cease to amaze me, Amber! Brilliant!!!
OMG Amber, I think I love you!!!!
ABSOLUTELY GENIUS!!!!!! You just saved me $28 ($14+$14). You totally rocketh!! Thank you for sharing your fabulous idea!!!
I do believe you are one of the most creative people on the planet!! This is simply brilliant!
Teri
Seriously.. could you dial it down a notch?? I can’t believe that you can just think up something, and have it work SO perfectly… every.time.
This is BRILLIANT, and your projects turned out perfect!!!
Only a month to go?! Wow… that seemed to be fast, but is it just me? I hope you’re enjoying the process, and just taking it all in – it’s over before you can blink!!
OMG Amber you are so CLEVER! I’m off to try this right now! Oh and the cards are soooooo pretty too.
Another “Amber-original” technique! You are so clever. Thanks for inspiring us yet again!
Brilliant idea! It´s always so inspiring to visit your blog!
Greetings from Austria,
Ulina
GOSH you are SO clever! That’s seriously making the most of your supplies! Brilliant!
What a fabulous idea! Another die set I don’t have to buy! Yay!!
Your projects look awesome! Thanks for sharing this. I have that die and will be giving this a try.
Amber, you’re a complete genius. Thanks so much for sharing your brilliant idea with us. I’m always looking to stretch my dollars (who isn’t) and I can’t wait to give this a try.
One word:
GENIUS!
x
Simply fabulous idea! And your cards are gorgeous…
What a great idea. I saw Jennifer McGuire do a video on extending the length of a die using the same technique. But I love how you used this die. Thanks!!
Wow! These are just gorgeous! And you are brilliant! I’m going to give it a try tonight!!
How do you come up with these things? You are simply amazing, that’s all there is to it. I was looking at these dies too but, like you, my crafting budget has been cut..due to my daughters upcoming wedding. So they were going to go on my wish list. Now I can just make my own! Thank you so much for the inspiration and the great how to pictures. I’m off to give this a try:)
you get a huge thanksfrom me!!! i loved this die too,but now i want to tty my own!
I was wondering how I could duplicate that die and your instructions are awesome! Thanks for sharing!
Well done, Amber – I did have to read your instructions a couple of time but I GET IT now – LOL – I am very tired, can I blame my dimness on that.
Love the look you achieved – beautiful, beautiful!!
Genius!! Love your ideas, girl.
Thanks so much. PTI is not getting my money any longer and ideas like this make it easier!
I put your ideas to work 🙂
Such a genius idea Amber :0)
Love the bottle hanger :0)
Jenny
This is amazing! A little more work than using a die but def more versatile! I ADORE your first project, which has such a perfect combination of colors and pattern. *sigh*
Besides your beautiful designs I really appreciate your creative generosity! I love you that are always sharing great tips and tutorials with your readers. Thanks for this great tip! I took quick break from my “real” work to do some light blog hopping on my favorite blogs (your included) and was forced to make it a longer break so that I could grab the cuttlebug, my Spellbinders Labels 18 dies and try this technique out! Great results have given me enough full to get back to work for a few more hours before I need another paper crafting break! Thanks again!
Wow, I love this! Thanks for sharing your creative genious. The nice part, you saved me money and some ordering frustration
You are my hero!!! Did I ever tell you that? I was kinda liking those Base-ics but not *loving* them. Certainly not loving them enough to spend money on them. But this? I *have* this! I can do this. I love this!!!
Loved your directions so I tried it for myself and am very pleased with the results! Thank you! http://mbryt1.blogspot.com/2012/03/wedding-gift-card-holder.html
Thanks, Amber! These are fantastic and this technique is something I would never have thought of for myself. 🙂
How wonderful is this?!! Wow…you always seem to amaze me, more and more! I can only imagine, what goes on in your head! lol hmmmm…. 🙂
Totally beyond fabulous – even beyonder than that!
I didn’t order this month either. I knew there had to be a way to make these on my own. Thanks for showing how to do it with the mat stack dies. Very clever!
Looks amazing, may have a bash myself now too tfs 🙂 Viv xx
Amber – perhaps you should consider registering for PTI for your wedding? Just a thought!
Brilliant, Amber, and can now see endless possibilities. Love it when I can cross things off my wish list and ave money. Thanks for sharing your creativity and awesome tips & techniques!
Quick Q: how did you keep the dies from cutting a section out of your card? did you put fun foam or tape along the edge of the die to keep that part from cutting and so only the “scallop” part of the Half & Half or MS cut and the sides of the die didn’t cut to the edge of the paper? (does that even make sense?)
I hope it is easy to make and very interesting, thanks for sharing.
plastic cards
clear cards
seriously! you’re a card-making genius! had added that die to my wish-list as well but now can save those pennies for something else. thanks!
Found you through Pinterest, wow, what a fantastic idea!!! Love it! Love your blog. Newest follower : )
Absolutely beautiful. I actually stumble onto your web site and have been addicted every since. I am just honored by all your work. You just hooked me.
Thank you….Diane
Hi, I can’t seem to find the envelope that will hold a set of cards. Can you help?
Love your ideas.