I love cake.
I love paper crafting.
I love a challenge.
All three of these loves came together for today’s project!
But first, the backstory…
A while back, I was contacted by a friendly blogger named Michal who owns a scrapbooking site. She wrote me a message full of very kind words and asked if I’d like to be featured on her site. I jumped at the chance!
You see…Michal lives across the globe in…Israel! I have never been to Israel, I don’t speak a word of Hebrew or Arabic… so I figured this was as close as I was going to get…at least for now!
Michal was especially interested in the templates I had designed and she asked if I’d be willing to come up with a little template to feature on her website. This was a win-win for me! I love the challenge of designing a template….I love paper crafting…and I knew exactly what this template would be….CAKE!!! I love cake!!! (not german chocolate though. it’s gross).
Now, let me not pretend that I am the originator of a cake box template. I certainly am not. BUT, I did design this template to be a bit different from the ones I’ve seen. It’s a little bigger, it’s easier to cut out (at least I think so), it’s designed to scale (just download and print!) and it’s free!
Today, I’ll be sharing one of the projects I made using this template…it’s a fun one!
First though…a quick photo-walkthrough of the template.
(click to download)
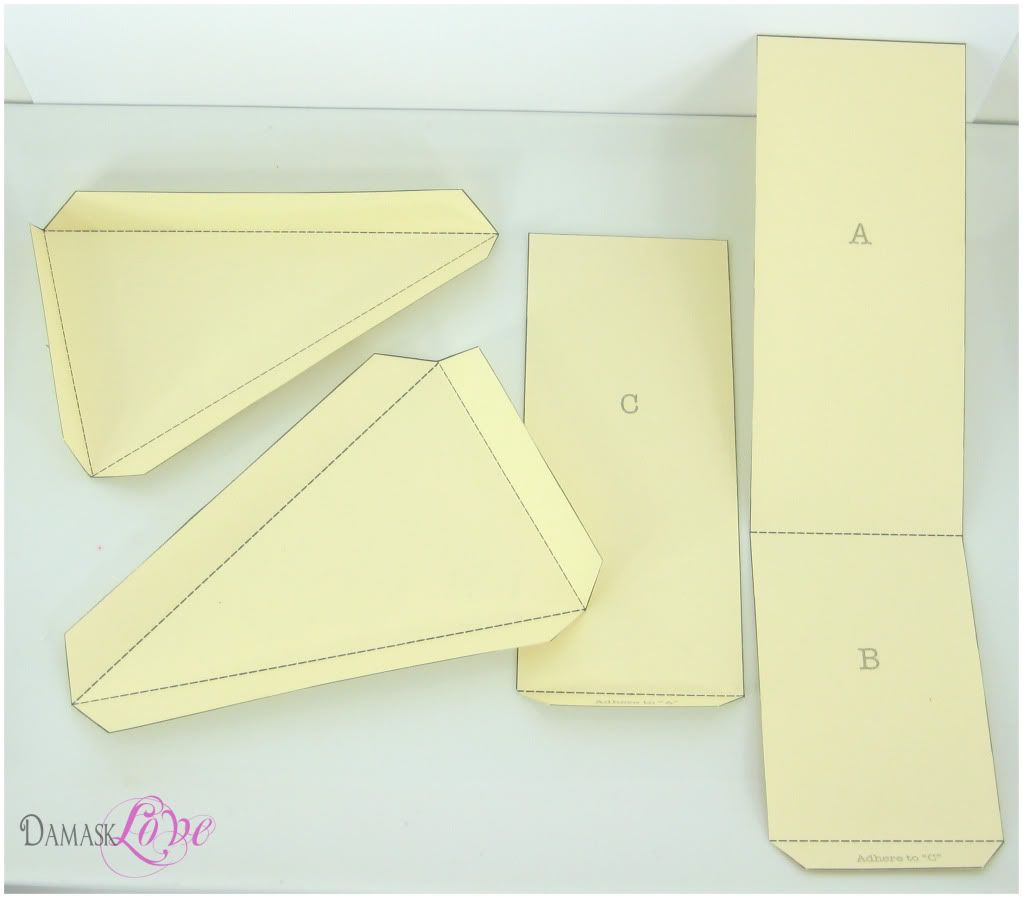
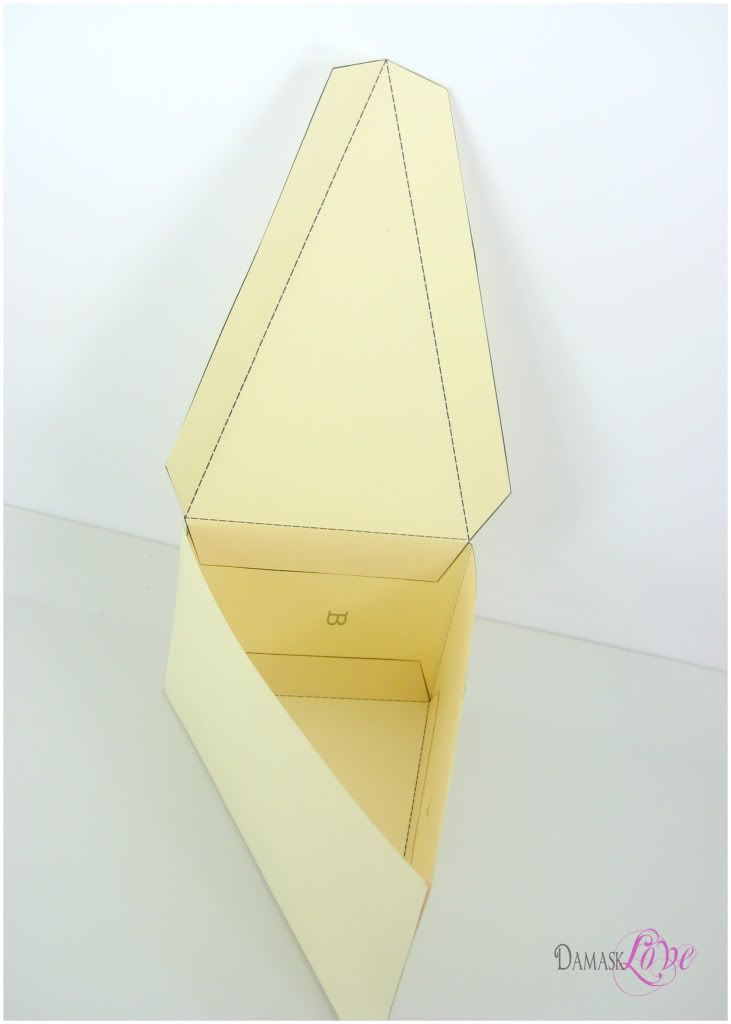
The template includes two pages and four shapes. Cut them out and score on the
dotted lines.
dotted lines.
The two strips labeled with letters will make up the side walls of the box.
The triangle shapes will be the top and bottom.
The triangle shapes will be the top and bottom.
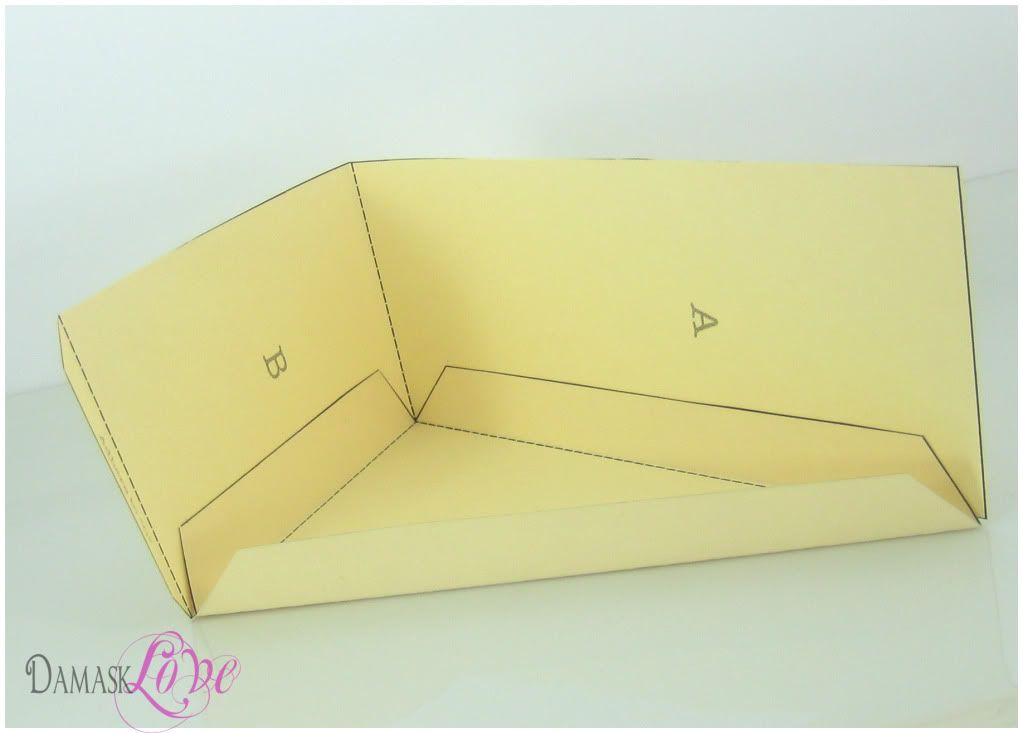
Connect the strips using the notched tabs at the end. Doing this will
create the complete wall of the box.
create the complete wall of the box.
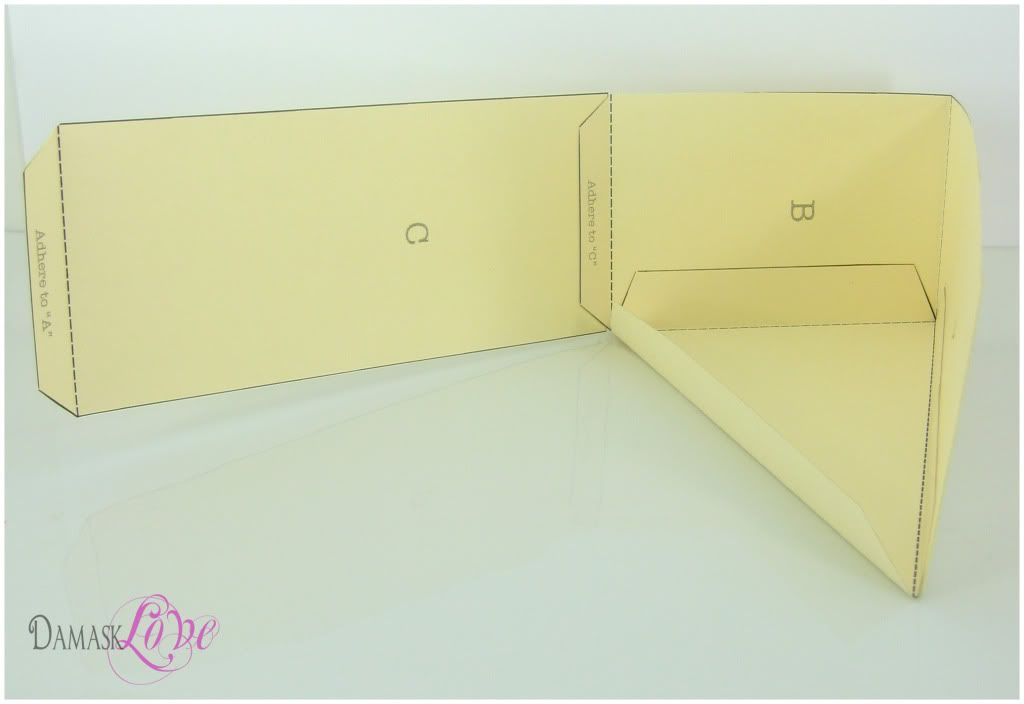
Adhere the top to the box so that it opens as pictured.
Fill the box with whatever you’d like and seal shut with adhesive
With the box assembled, the possibilities are endless for decorating it.
For my project….I did things a little differently…shocker, I know.
Everyone has seen a cake box before. You know what they look like, how they’re decorated…so there’s no need to do that here, right?
Instead, I decided to turn this template on it’s head….literally.
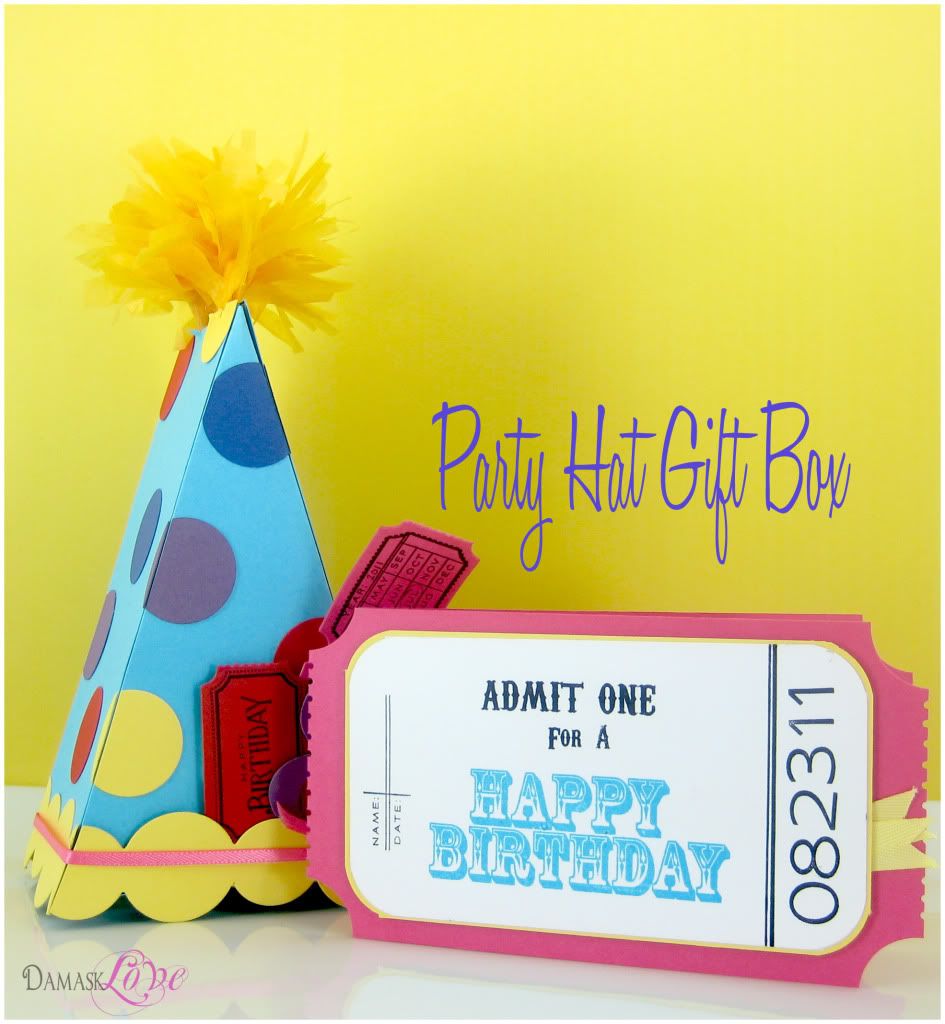
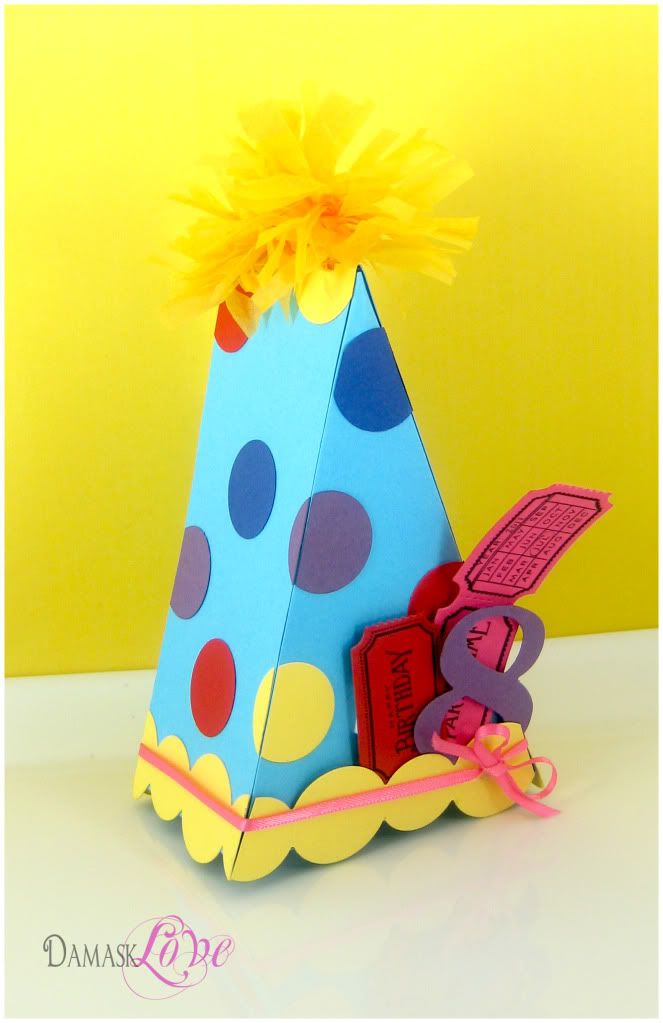
I took the cake box and dressed it up for a party!!! A birthday party!!
I printed the template onto blue cardstock, then decked it out with polka dots and a tissue paper topper! A few die cut tickets added some flair.
The die cut tickets gave me the idea to make a cute, coordinating card for this little gift box.
I used my 1/16″ hole punch to cut notches from the card edge to mimic the perforation on a carnival ticket.
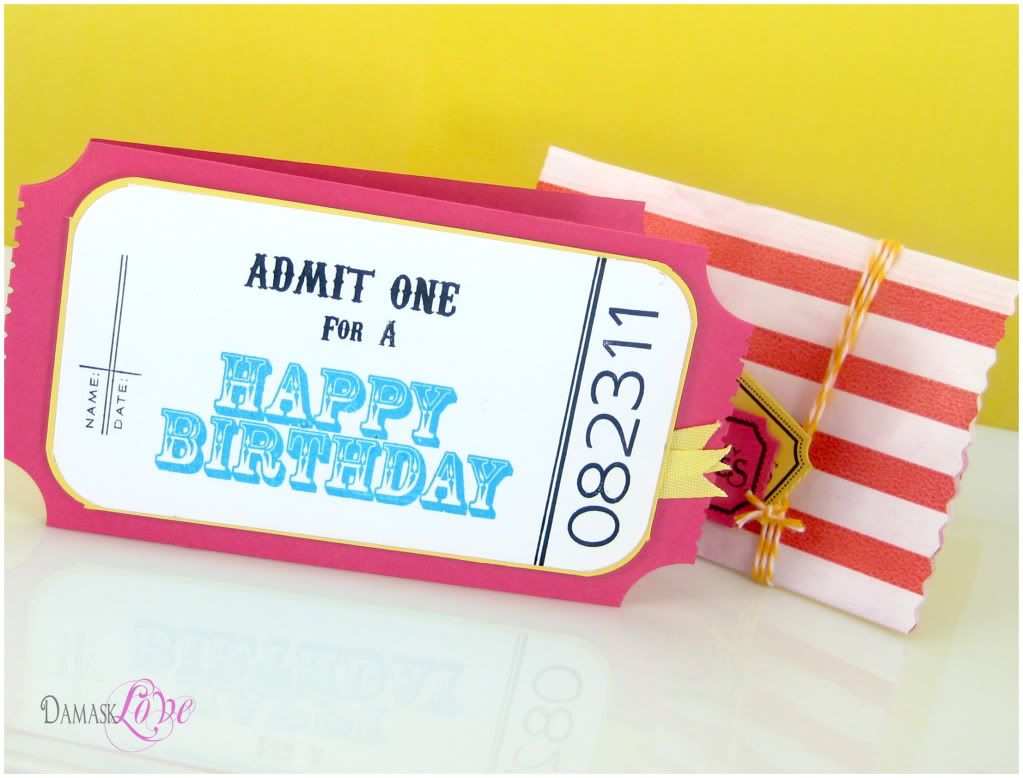 |
| I packaged the card in a striped glassine bag from Sweet Lulu Shop… check it out, you’ll love the products, I promise! |
Thanks for stopping by for some Damask Love! Come back tomorrow when I’ll share another project using this template! It’s gonna be a fun one:-)
Edited to add: Check out the article. You can use Google Translate to read it in English!
Supplies:
Ticket Card:
Stamps: PTI (Fresh Alphabet, Say it With Style, Just the Ticket) My Cute Stamps (Circus Animals)
Cardstock: PTI (Raspberry Fizz, Harvest Gold, White)
Ink: Ranger Archival Ink Jet Black, Stampin Up Tempting Turquoise
Other: PTI twill ribbon, corner rounder, 1″ circle punch, 1/16″ hole punch, Sweet Lulu Shop striped glassine bag
Party Hat: Gift Box:
Stamps: PTI (Just the Ticket)
Cardstock: PTI (Hawaiian Shores, Harvest Gold, Pure Poppy, Plum Pudding)
Ink: Ranger Archival Ink Jet Black
Other: PTI Simple Circles Die, PTI By the Numbers Die, Damask Love Cake Box Template, Michael’s pink ribbon




After study a couple of of the blog posts on your web site now, and I really like your manner of blogging. I bookmarked it to my bookmark web site record and will probably be checking again soon. Pls take a look at my site as properly and let me know what you think.
I have noticed that over the course of building a relationship with real estate homeowners, you’ll be able to get them to understand that, in most real estate contract, a commission rate is paid. Eventually, FSBO sellers will not “save” the percentage. Rather, they fight to win the commission by means of doing a strong agent’s occupation. In doing so, they commit their money in addition to time to carry out, as best they might, the assignments of an agent. Those tasks include exposing the home via marketing, delivering the home to willing buyers, making a sense of buyer emergency in order to induce an offer, arranging home inspections, dealing with qualification inspections with the loan company, supervising repairs, and facilitating the closing of the deal.
Usually I do not learn article on blogs, however I wish to say that this write-up very forced me to try and do so! Your writing style has been amazed me. Thanks, very nice article.
you are in reality a excellent webmaster. The web site loading velocity is incredible. It kind of feels that you’re doing any distinctive trick. Also, The contents are masterwork. you’ve done a wonderful job on this topic!
Hello, I think your website might be having browser compatibility issues. When I look at your website in Firefox, it looks fine but when opening in Internet Explorer, it has some overlapping. I just wanted to give you a quick heads up! Other then that, fantastic blog!
I have realized that in digital camera models, extraordinary receptors help to {focus|concentrate|maintain focus|target|a**** automatically. Those sensors of some camcorders change in contrast, while others make use of a beam with infra-red (IR) light, specifically in low light. Higher specification cameras from time to time use a combination of both devices and could have Face Priority AF where the dslr camera can ‘See’ your face as you concentrate only on that. Thanks for sharing your ideas on this website.
Hello There. I found your blog the usage of msn. That is an extremely neatly written article. I?ll be sure to bookmark it and come back to learn extra of your useful information. Thank you for the post. I will certainly comeback.
I am really enjoying the theme/design of your web site. Do you ever run into any browser compatibility problems? A number of my blog readers have complained about my site not working correctly in Explorer but looks great in Safari. Do you have any recommendations to help fix this problem?
Howdy I am so excited I found your site, I really found you by error, while I was looking on Aol for something else, Anyhow I am here now and would just like to say thanks for a fantastic post and a all round interesting blog (I also love the theme/design), I don’t have time to go through it all at the minute but I have saved it and also added your RSS feeds, so when I have time I will be back to read more, Please do keep up the awesome work.
Hello, Neat post. There is a problem together with your website in web explorer, could check this? IE nonetheless is the market leader and a big portion of folks will pass over your wonderful writing because of this problem.
Can I simply say what a relief to search out somebody who truly knows what theyre speaking about on the internet. You undoubtedly know how you can convey a problem to gentle and make it important. More folks need to learn this and understand this aspect of the story. I cant imagine youre not more fashionable since you undoubtedly have the gift.
Another thing I’ve really noticed is the fact that for many people, bad credit is the results of circumstances beyond their control. Such as they may be really saddled by having an illness and because of this they have excessive bills going to collections. It could be due to a work loss or perhaps the inability to do the job. Sometimes divorce process can really send the budget in an opposite direction. Many thanks sharing your thinking on this blog site.
Wonderful beat ! I would like to apprentice while you amend your site, how could i subscribe for a blog website? The account helped me a acceptable deal. I have been a little bit acquainted of this your broadcast provided brilliant clear idea
It is my belief that mesothelioma is definitely the most fatal cancer. It’s got unusual characteristics. The more I really look at it a lot more I am sure it does not act like a real solid cells cancer. In case mesothelioma is often a rogue virus-like infection, so there is the chance of developing a vaccine and offering vaccination to asbestos exposed people who are vulnerable to high risk regarding developing long term asbestos related malignancies. Thanks for discussing your ideas about this important health issue.
very nice publish, i actually love this website, keep on it
I don?t even know how I ended up here, but I thought this post was good. I do not know who you are but certainly you’re going to a famous blogger if you are not already 😉 Cheers!
One more thing. I think that there are lots of travel insurance sites of respectable companies than enable you to enter your trip details and obtain you the rates. You can also purchase the international holiday insurance policy on-line by using your own credit card. All you have to do will be to enter your travel specifics and you can see the plans side-by-side. Simply find the package that suits your capacity to pay and needs after which it use your bank credit card to buy that. Travel insurance online is a good way to check for a dependable company regarding international travel cover. Thanks for revealing your ideas.
Helpful post! A friend recommended scarboroplumbing.com.au when I needed a Plumber Glendalough, and they exceeded expectations. Definitely worth checking out.
Helpful post! A friend recommended scarboroplumbing.com.au when I needed a Plumber Glendalough, and they exceeded expectations. Definitely worth checking out.