The magic happens post-production. That’s my attitude about blog photography. I’ve heard many other bloggers say that they never go into a shoot planning to making edits to the photos. I wish I was that good. I’m not. I know that almost every photo that I take will need to be edited. Sometimes I get lucky and the photo doesn’t need much help – but usually it does. As a result, I have a pretty systemized, albeit, simplistic routine for editing my photos.
Today, we’re wrapping up “The Non-Photogs Guide…” with what is perhaps the most blasphemous of all the posts in this series. I’ve said it before, but I’ll repeat myself – if you are a professional photographer or if you have a reasonable knowledge of photo editing techniques – I suggest you turn back now. I am neither of these things and I am probably doing this all wrong…but I’m cool with that. In the end, I just want photos that look pretty to me. With that disclaimer out of the way, let’s get started.
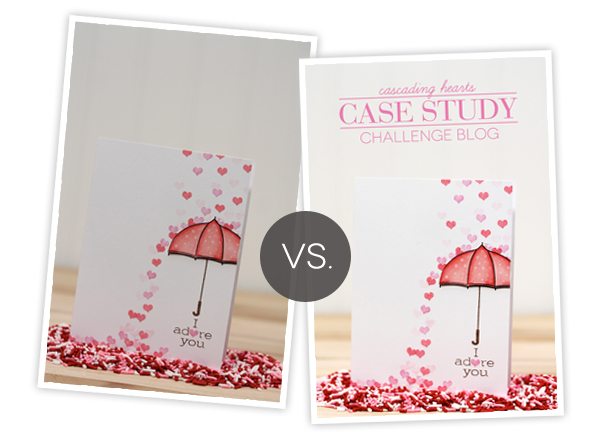
Here’s an example of what editing does for my photos. What first looked like a good photo, looks dingy, muted and overcast once the editing process is finished.

 Click through for the full post on editing!
 I use Adobe Photoshop and Adobe Illustrator Cs4 for all of the photo editing and graphic design that you see on Damask Love. In today’s post, I’ll be referencing Photoshop CS4 and all the tools that I use within this program. Of course, this will be directly applicable for those of you who also use Photoshop. If you use another editing software, I hope that you’ll find this information useful and can translate it into your own programs.
  My preference for all the photos on Damask Love is to err on the side of bright and maybe even a little overexposed, with moderate saturation. To my eye, that is more visually consistent with the look my blog and the photos look “at home” when they are very bright white with vivid colors.
Each time I open a photo in Photoshop, the very first thing I do is work with the “Levels.” (Image>Adjustments>Levels). Here’s the lowdown on “Levels.”
Levels refer to the range of white, black and midtone colors that exists in your photo. Ideally, the histogram in your Levels window will span all the way from the black slider, all the way to the white slider. For me, this rarely happens – so I have to adjust the sliders. I usually start by sliding the black and white sliders to the edge of the histogram and see what happens. As long as you have the “Preview” option checked, you’ll be able to see your changes happen live as you make them.
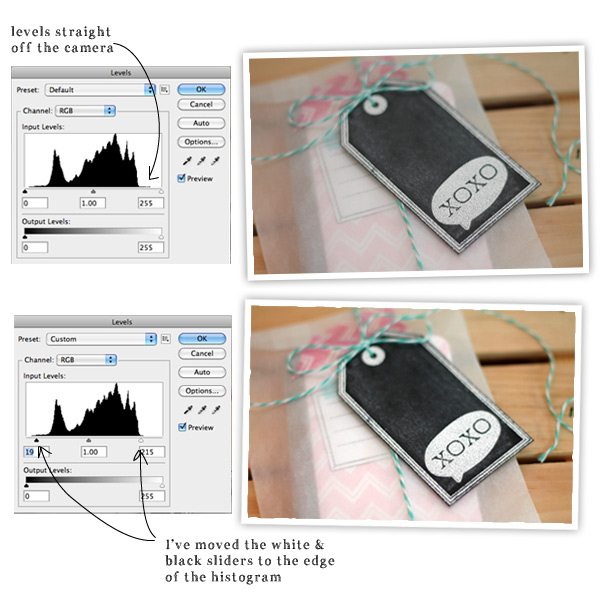 You can see, that in the second photo the black of the tag is darker, the white is brighter and the overall photo is more vibrant.
  Once I’ve adjusted the Levels, I usually move to Saturation (Image>Adjustments>Hue/Saturation). I think of Saturation as the “er” tool. Not every photo needs more “er” but I like to add “er” to many of mine. What do I mean by “er” ? Saturation makes reds redder, greens greener, yellows yellower…you get the point. Saturation makes colors more…well…saturated. A word of advice about Saturation, don’t go nuts. Too much can make your photos look radio active. With that in mind – have fun with it! I found the Saturation tool especially useful for the Superhero Party I hosted. In this case, the colors needed to be super vibrant…
  For this photo, I jacked up the Saturation slider to +36, which is much higher than I usually use, but it works for the purpose of this photograph. Superheros don’t like dull colors. Thanks to Elena for her tip on this.
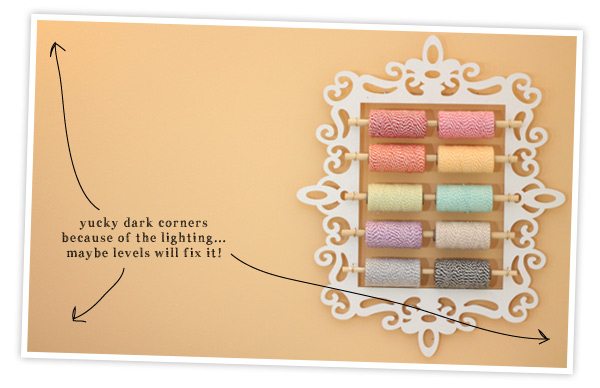
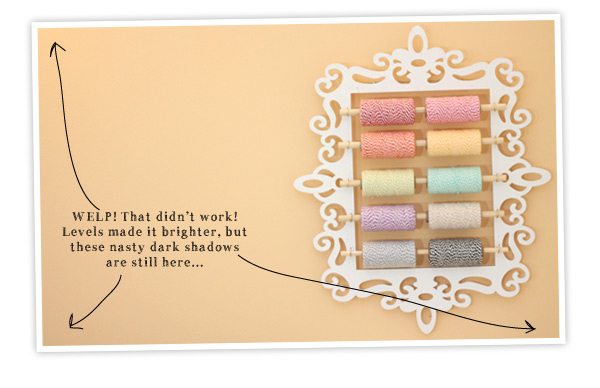
 My adjustments to each photo usually only include levels and adjustments – I find that this gets me to where I want to be. A bright photo with vivid colors. Every so often, I break out the brush tool for a little airbrushing to remedy uneven backgrounds that result from uneven light. Here’s what I mean:
For this airbrushing technique, you’ll need three items from your tool palette in Photoshop: 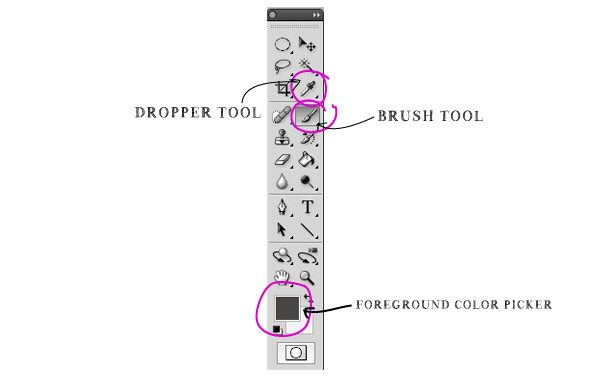

{1} Access your “Brushes” toolbar (Window>Brushes) and select the brush shape you will use. I work with larger sizes, the blending is better that way.
{2} Adjust the “Opacity” and “Flow” – I usually set Opacity to 55% and Flow to 35% or so. Doing this allows you to create subtle brushstrokes that will blend and look natural in your photo.
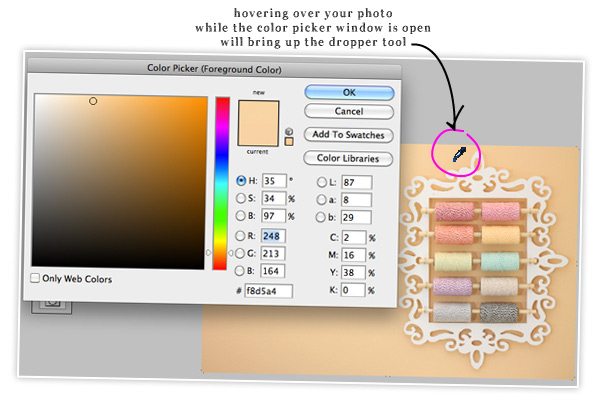
{3} Click on the Foreground Color Picker on the tools palette to bring up the selection window. With the window open, hover over your photo. This will bring up the dropper tool. Use the dropper tool to select one of the lighter shades in the background in your photo. By simply clicking on it, the dropper tool will “suck up” the color you chose and apply that as the foreground color. By doing this, you have now chosen the color that your paintbrush will apply when used.
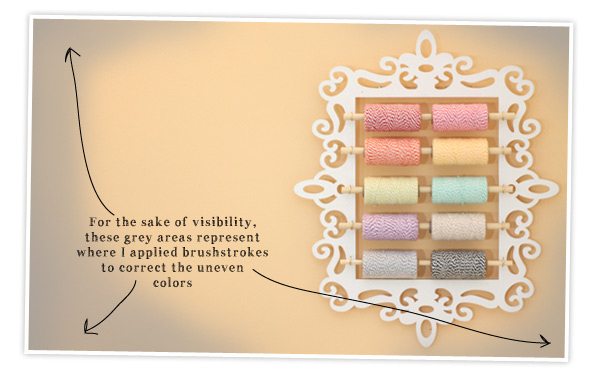 {4} Create a new layer (Layer>New>Layer) and apply your brushstrokes to the areas that need correction. You can go over areas that need more coverage and use quicker movements to blend. You’ll see it come together as you go, and if the color doesn’t look quite right, return to step 3 and select a different color.
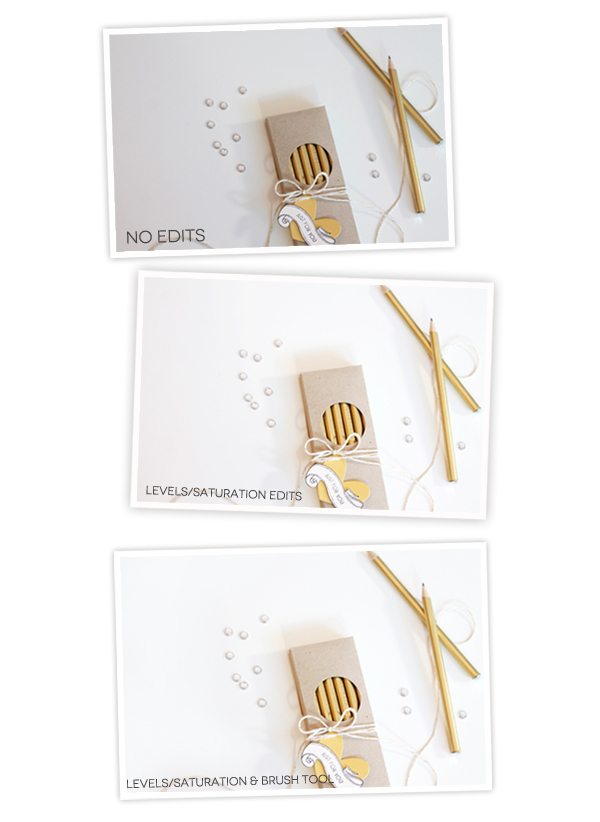
 Here’s another example of this same approach with a white background that was not so white at first…
 So your photo is done and ready to make it’s blog debut! It’s time to save it properly so that your readers won’t be waiting forever for the photos to load.
You’ll want to save your photos for web (File>Save for Web & Devices)…
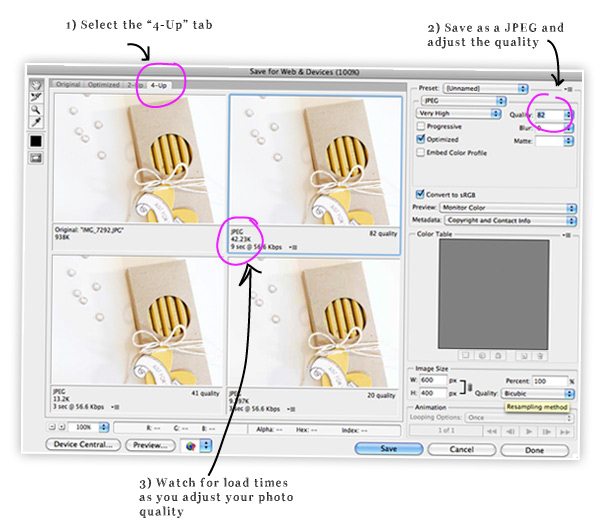
{1} Once you access the “Save for Web & Devices” window, select the “4-Up” tab. This will bring up four images of your photo – each with a different quality. This will allow you to see the visual differences in quality ratings.
{2} You’ll now want to select JPEG as the type of image, then adjust the quality. I used to think that all my photos had to be 100% quality, but turns out that 100 looks just the same as 80…and 80 has a much lower file size and load time.
{3} As you adjust the quality, you will see the specs on your photo change. You’ll be able to see how it compares to the original file and what the load time will be. The goal is to find a balance between load time, quality and size. I typically keep my photos in the 70-85 range and that works well…your server will thank you for not overloading it! (I learned this the hard way!)
PHEW! And so ends our little (not-so-little) lecture on blog photos…from a girl who doesn’t really know a ton about photography. This is just how I do things around here…I hope this has been helpful!
Now..what shall we tackle next? Let me know your ideas for the next Office Hours!

Hello. It is best to write to 8allocate https://8allocate.com/article/what-is-dedicated-team-model/ – we hire them for all projects, and have never regretted it. I am pleased that I can always say with a calm soul that my business is going well. Because I know that they are handled by specialists with broad powers and extensive knowledge. This is not only flexible and efficient work – it is also an opportunity to hire new people, to look for completely new ways to solve problems that arise.
American Web Builders made a reputation for itself in the market by providing cutting-edge projects that display not only their knowledge but also their competence in website design. American Web Builders made a reputation for itself in the market by providing cutting-edge projects that display not only their knowledge but also their competence in wordPress E-commerce web development.
When I started working and creating my online business, I didn’t even think that I would have to take into account so many details and keep track of everything. Analytics was especially difficult for me, so I decided to contact Apiko for scm logistics software development services. Having convenient software for analytics and creating various reports, work has really become easier.
Take the shot you want to use, and get it in your camera. Make sure it’s the right size, with good lighting and focus. The best place for taking photos is often where you can see most of what’s being photographed from, so look around and find a place that’s comfortable for you. For example, if you’re taking pictures of flowers or food, try to find somewhere where there are plenty of plants or fruit nearby. I will also visit https://gbhbl.com/how-to-get-lucky-with-no-deposit-bonuses-in-online-casino-canada/ website in order to know how to get lucky with no deposit bonuses.
hello
As a photographer, it’s important to me that all the photos I take for clients are sent quickly and safely. I used to use instant messengers, but this is inconvenient. I decided to google which is google drive safe for confidential information, and in general, I realized that cloud-based tools are a cool option for both me and my clients.
In fact, video calls in the app are very cool! If you want to quickly and efficiently integrate them into your application, then I recommend that you visit this site https://www.digitalsamba.com/video-sdk . There you can find all the necessary and useful information for you! I think this should help you with solving your problem!
I’ve been using ProcessMix for a few months now, and I’ve been very impressed with the results. The platform is fast, has an excellent UI/UX and a lot of features. In addition, it is very affordable. ProcessMix is a low-code backend platform with native development capabilities, so you can get started quickly and Build API the way you need it.
I am convinced that it is necessary to constantly look for new methods for more efficient use of time.
It is appropriate time to make some plans for the future and it is time to be happy.
I’ve read this post and if I could I wish to suggest you few interesting things or tips.
Perhaps you could write next articles referring to this
article. I wish to read more things about it!
Your tricks are cool, I also do vignetting manually. I prefer to have more control over the effect and, when necessary, enlarge the effect in one of the corners where, for example, text or a logo appears
canadian compounding pharmacy
https://expresscanadapharm.com/# Express Canada Pharm
canadian pharmacy meds
Leading with compassion on a global scale.
where can i buy cipro prices
The epitome of excellence in international healthcare.
Their worldwide outreach programs are commendable.
lisinopril online no script
The pharmacists are always updated with the latest in medicine.
The gold standard for international pharmaceutical services.
gabapentin to treat depression
Comprehensive side effect and adverse reaction information.
The children’s section is well-stocked with quality products.
buying cheap cipro without dr prescription
A model pharmacy in terms of service and care.
alo789hk: alo789 dang nh?p – 789alo
alo 789: alo789 chinh th?c – alo789hk
https://indiamedfast.shop/# lowest prescription prices online india
reliable canadian online pharmacy
mexican pharmacy online order: mexican pharmacy online order – reliable mexican pharmacies
best canadian online pharmacy: legitimate canadian pharmacies online – canadian pharmacy store
https://interpharmonline.com/# canadian pharmacy online
cheapest online pharmacy india: IndiaMedFast.com – India Med Fast
http://mexicanpharminter.com/# Mexican Pharm International
safe reliable canadian pharmacy: Pharmacies in Canada that ship to the US – online canadian pharmacy
canada rx pharmacy world: InterPharmOnline – canadian pharmacy no rx needed
https://mexicanpharminter.com/# mexican drug stores online
canada rx pharmacy
https://interpharmonline.shop/# northern pharmacy canada
mexican pharmacy online: mexican pharmacy online order – mexican drug stores online
https://indiamedfast.com/# india pharmacy without prescription
MexicanPharmInter: mexican pharmacy online order – Mexican Pharm Inter
lowest prescription prices online india: buying prescription drugs from india – india pharmacy without prescription
canadian drug pharmacy: Cheapest online pharmacy – legal to buy prescription drugs from canada
http://interpharmonline.com/# my canadian pharmacy rx
IndiaMedFast: IndiaMedFast – india pharmacy without prescription
canadianpharmacymeds com: Inter Pharm Online – canadian drugs online
https://tadalafileasybuy.com/# TadalafilEasyBuy.com
cialis without a doctor prescription: Tadalafil Easy Buy – Cialis over the counter
https://generic100mgeasy.shop/# Generic 100mg Easy
kamagra pillen kopen: KamagraKopen.pro – kamagra kopen nederland
KamagraKopen.pro: Kamagra – Kamagra
https://kamagrakopen.pro/# kamagra gel kopen
TadalafilEasyBuy.com: Cialis over the counter – Tadalafil Easy Buy
Kamagra Kopen Online: Officiele Kamagra van Nederland – kamagra jelly kopen
http://tadalafileasybuy.com/# Tadalafil Easy Buy
https://tadalafileasybuy.shop/# buy cialis pill
kamagra jelly kopen: kamagra kopen nederland – kamagra pillen kopen
Generic 100mg Easy: Generic 100mg Easy – Generic 100mg Easy
https://generic100mgeasy.shop/# buy viagra here
kamagra kopen nederland: KamagraKopen.pro – KamagraKopen.pro