
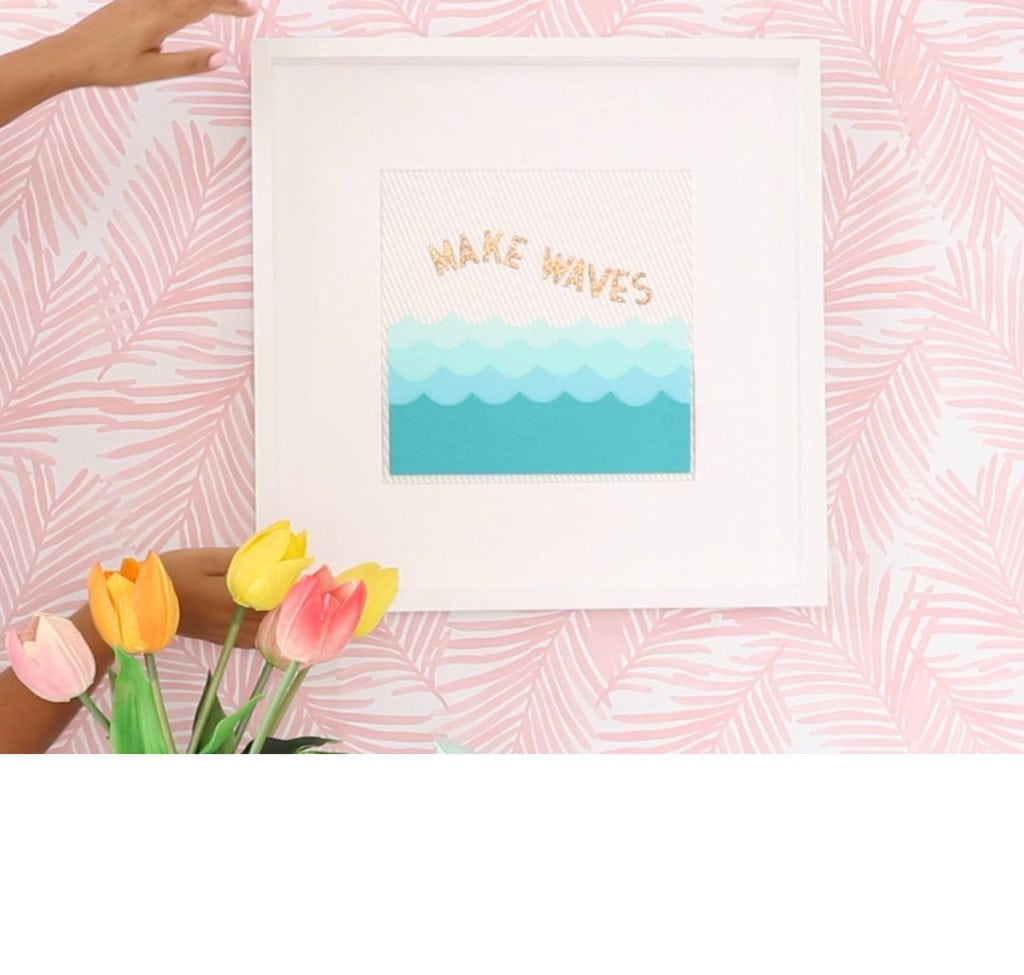
Perhaps the most popular DIY I’ve ever shared on Instagram! After posting THIS high paced tutorial, I got a TON of questions about what materials, tools and which SVG file I used to create this stunning wall art.
I wish I could take credit for it, but truth is, this art was created by Rob + Bob and it’s been hiding in plain sight right over in Cricut Design Space!
That said, I did make some pretty significant alterations to this project so you’ll likely want to just use my link so you can access it directly and save yourself a LOT of time!
As for the other materials I used, here’s the rundown:
A couple tips when assembling your art:
- I used the Cricut Joy for my artwork, but the Cricut Joy can only accommodate projects that are 4.5″ across. This is why you’ll see a version of this project where the faces are split into two. This will allow you to cut it on the Cricut Joy.
- Take your time placing each of the elements and do your best to get them even! It doesn’t have to be perfect!


The Onewalmart GTA gateway is the worldwide time and attendance (GTA) gateway for your staff. This gateway makes it simple for Walmart employees to check in and leave. When you check in or out on the Onewalmart GTA portal, your timestamp information is stored at Walmart Central. Walmart has access to its employees’ attendance records.
one walmart gta portal attendance
That’s a fantastic way to create personalized wall art! It’s great that you shared the link to your altered version, saving everyone time. I’m always looking for quick and fun projects like this. Speaking of quick and fun, have you ever played Run 3
Great breakdown of digital signage trends! If you’re exploring LED Video Wall options for your office or event venue in Singapore, do take a look at zoomvisual.com.sg. They offer some of the most visually striking and customizable video wall solutions I’ve seen.
See the whole ✳️ This week’s and next week’s Whole Foods weekly advertisements! To move through every page of the Whole Foods Ad Flyer, use the left and right arrows.
Prepare your coupons for the early Whole Foods weekly ad circular and schedule your shopping trip in advance.
Whole Foods Ad
I recently completed the Panda Express Feedback survey after my visit, and I really appreciate how simple and user-friendly the process was. It only took a few minutes, but it allowed me to share detailed thoughts about my meal, the freshness of the food, and the friendliness of the staff. I ordered Orange Chicken and Chow Mein, and both were hot and flavorful. The survey asked relevant questions about cleanliness, speed of service, and overall satisfaction, which made me feel like my opinion truly matters. I believe customer feedback plays a big role in maintaining quality, and Panda Express is clearly committed to improving based on real customer experiences. https://pandexpresssurveys.website/
See the full Jewel Osco Weekly Ad this week and the ✳️ Jewel Osco Ad the following week! Examine the entire Jewel Osco weekly advertisement circular.
Get your coupons ready for the Jewel Osco weekly ad’s early preview, which will feature some incredible discounts! Return often to ensure you are taking advantage of all the most recent Jewel Osco weekly deals.
Jewel Weekly ad Preview
See the whole ✳️ This week’s Winn Dixie Sale Ad and the Winn Dixie Ad Preview for next week! To view every page of the Winn Dixie Weekly Flyer, use the left and right arrow keys. We appreciate Sam alerting us to the early advertisement!
It’s extremely simple to look at this week’s Winn Dixie advertisement. To make it simple to determine if the item you are looking for at the Winn Dixie grocery store is on sale or not, the sales are categorized. To avoid overspending, make sure to check the Winn Dixie weekly sales the following week to see if the item you wish to purchase is on sale.
Winn Dixie Weekly ad
View the full ✳️ Food City Weekly Ad for this week and the Food City Ad for next week! Use the left and right arrows to view each page of the Food City weekly ad circular. Plan your shopping trip ahead of time and get your coupons ready for the early Food City weekly ad preview!
Looking through the Food City weekly flyer is really easy. This week’s Food City sales are grouped to make it easy to find out if the product you’re looking for is on sale. Regardless of the products you want to buy, don’t forget to look at the Food City advertisement for next week.
Food City Weekly Ad Preview
View the full ✳️ Smart and Final Weekly Ad for this week and the Smart and Final Ad for next week! Use the left and right arrows to navigate through each page of the Smart and Final weekly ad circular. Plan your shopping trip ahead of time and get your coupons ready for the early Smart and Final weekly ad peek!
Smart and Final Weekly Ad Preview
Love this wall art! Has anyone tried making similar DIY wall decor on commission, and how profitable is it—can you really make money from it?
View the whole ✳️ Next week’s ✳️ and this week’s Dollar General Weekly Ad General Ad for Dollars Examine each page of Dollar General’s weekly sales advertisement. Get your coupons ready for the next Dollar General Weekly Ad!
Discover the best deals and save a ton of money by looking through the Dollar General ad preview! Don’t miss the amazing offers in Dollar General’s weekly flyer!
https://dollargeneralweeklyad.info/
Check out this week’s complete Lidl Weekly Ad and next week’s Lidl Ad! Go through every page of the weekly ad circular from Lidl.
Prepare your coupons for the early peek of the Lidl weekly ad, which will include some bogo discounts! To ensure you are seeing all of the new Lidl weekly discounts, return frequently.
The Lidl weekly flier is quite simple to peruse. To make it simple to determine whether or not the product you are looking for is on sale during this week’s Lidl discounts, the sales are divided into categories.
Lidl Ad
The new advertisement starts on Wednesday or Thursday and runs for a week, depending on your store (check your business to see which schedule they utilize). Get your coupons ready for the early ✳️ and plan your shopping trip ahead of time. A sneak peek at the weekly Publix advertisement including some bogo deals!
You can save a substantial sum of money by looking over the Publix ads for next week and choosing the best deals! Don’t miss the amazing deals in the upcoming weekly Publix ad!
publix bogo next week
View the entire ✳️ Brookshires Ad for this week and the Brookshire’s Weekly Ad for next week! Use the left and right arrows to navigate through each page of the Brookshires Ad Flyer.
Plan your shopping trip ahead of time and get your coupons ready for the early Brookshire’s weekly ad circular.
Brookshire’s Ad
View the full ✳️ Harris Teeter Weekly Ad for this week and the Harris Teeter Ad for next week! Use the left and right arrows to navigate through each page of the Harris Teeter weekly ad circular. Plan your shopping trip ahead of time and prepare your coupons for the early Harris Teeter weekly ad preview!
Return often to ensure you are taking advantage of all the new Harris Teeter weekly deals.
Harris Teeter Weekly Ad
Check out this week’s complete Fresh Thyme Weekly Ad and next week’s Fresh Thyme Ad! To view every page in the Fresh Thyme Weekly Flyer, use the left and right arrows.
Prepare your coupons for the early Fresh Thyme weekly ad circular and schedule your shopping trip in advance.
Fresh Thyme Weekly Ad
Homeowners often ask how much does finishing a basement cost before starting a renovation so they can plan a clear budget. The final price depends on the basement size, materials, and design features you choose.
That’s cool fascinating. I love it much.
View the full ✳️ Jewel Osco Weekly Ad for this week and the ✳️ Jewel Osco Ad for next week! Examine each page of Jewel Osco’s weekly ad circular.
Get your coupons ready for the first look at the weekly Jewel Osco advertisement, which will offer some bogo deals! Returning often will ensure that you see all of the most recent Jewel Osco weekly specials.
Jewel Weekly ad Preview
View the entire ✳️. Examine each page of the Stop and Shop weekly advertisement for this week’s Stop and Shop Circular and the Stop and Shop Flyer for next week.
Get your coupons ready for the early Plan your shopping trip ahead of time with Stop & Shop Weekly Circular!
The Stop and Shop advertisement for this week is easy to read. Make sure to visit Stop & Shop often to take advantage of all the new weekly promotions.
Stop and Shop Weekly Ad
The ShopRite campaign starts on Friday or Sunday, depending on where you reside, however they are essentially the same.
Plan your shopping trip ahead of time and prepare your coupons for the early ShopRite weekly ad preview, which includes some ShopRite weekly ad bogo deals! Returning often will ensure you see all of the most recent ShopRite weekly deals.
shoprite weekly ad
View the full ✳️ Schnucks Weekly Ad for this week and the Schnucks Ad for next week! Look over each page of the weekly advertisement circular from Schnucks.
Plan your shopping trip ahead of time and prepare your coupons for the early Schnucks Weekly Ad Preview, which includes some Schnucks weekly ad bogo savings!
Take a look at the entire ✳️ Hannaford Weekly Flyer this week and the advertisement for next week! Use the left and right arrows to navigate through each page of the Hannaford Weekly Flyer.
Plan your shopping trip ahead of time and get your coupons ready for the early Hannaford weekly ad circular.
Hannaford Weekly ad
Because the Cricut Joy maxes out at a 4.5″ cutting width, I had to get a little creative with this artwork! To make it completely Joy-friendly, you’ll find a version of the project where the faces are split into two pieces. This allows you to easily cut the design within the machine’s limits and assemble them afterward.
Thank you for creating such a helpful guide. Online menu resources have become increasingly valuable because customers often want to review food choices before visiting a restaurant. During my search for menu-related information, I came across Village Inn Menu Information Center and found the content highly useful. The website explains menu sections, featured meals, and ordering information in a clear and user-friendly manner. Educational resources like this save customers time while making restaurant planning much more convenient. Having reliable menu information available online is always beneficial.
This is a very informative article that explains the purpose of the NewJetnet employee portal in a simple and practical way. Employees often need quick access to payroll information, work schedules, travel benefits, company news, and HR resources from one secure platform. While researching employee portal resources, I recently visited NewJetnet Guide and found the information extremely helpful. The website provides detailed explanations regarding account access, login procedures, and employee services. I especially appreciate how the content is organized in an easy-to-follow format. Resources like this help employees stay informed and make better use of workplace technology.
View the whole The Giant Weekly Ad for this week and the Giant Ad for next week! Use the arrows to scroll across each page of the Giant Weekly Flyer. Plan your shopping trip ahead of time and get your coupons ready for the early Giant Food Weekly Ad!
Return often to ensure you are seeing all of the most recent Giant weekly offerings.
View the complete ✳️ Harris Teeter Weekly Ad for this week and the Harris Teeter Ad next week! Utilize the Harris circular. Get your coupons ready for the early Harris Teeter weekly ad preview and plan your shopping trip in advance!
Check back often to make sure you are viewing all of the new Harris Teeter weekly promotions.
Check out this week’s complete ✳️ Superior Weekly Ad and next week’s Superior Ad! Go through every page of the weekly advertisement circular from Superior Grocers.
Plan your shopping excursion ahead of time and prepare your coupons for the early https://superior-weeklyad.shop/, which offers some Superior weekly ad bogo discounts!
Return often to ensure you are seeing all of Superior’s most recent weekly offers.