Julie Andrews may be a fan of tying her paper packaging up with string, but I’m going a different route. The combination of sparkly glitter and rustic neutral tones is one of my faves…so I’m sharing some fun “Brown Paper Swag” projects and products with you this week.
Today’s “Brown Paper Swag” combo is all about burlap and gold…are you loving this yet? I decided to try my hand at heat-embossing on fabric and the results are pretty cool. Here’s what I did:
- A burlap or muslin drawstring bag. I made mine but you can also purchase HERE.
- Gold embossing powder & a heat embossing gun
- Crafting Glue (My favorite is Aleene’s Tacky Glue)
- A foam brush
- Polka Dot Stamp (I used Clear & Simple Stamps Circles Plus Set)
- Chipboard
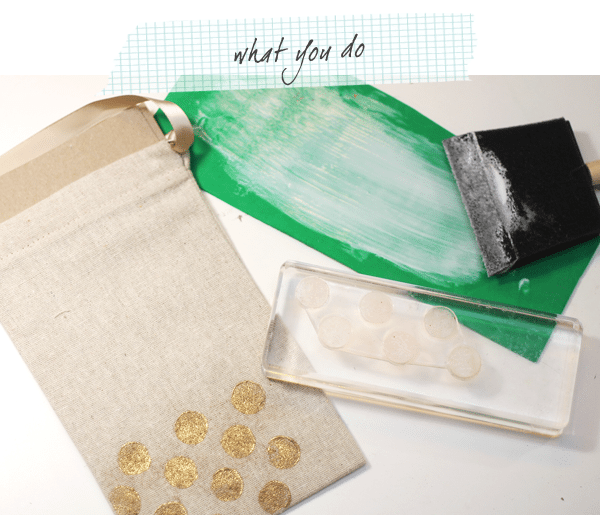
1) Smear the glue on a piece of paper or a piece of fun foam using the foam brush. This will create a “glue pad.”
TIP: I use this method rather than a traditional glue pad or an embossing ink because the flatness of the fun foam will allow you to get glue ONLY on the polka dot pattern on the stamp instead of the spaces in between. This will make it much easier to get a clean pattern on your fabric. Also, the thickness of the glue is great for getting the embossing powder to adhere nicely to the fabric. I did not have nearly as much success when using an embossing ink pad.
2) Insert chipboard into the bag so that the fabric is taut.
3) Dab your stamp in the thin layer of glue then stamp the glue on to the fabric bag.
4) Sprinkle on embossing powder, then use heat gun to set the embossing powder. Repeat until the bag is complete.
TIP: When heat embossing fabric, keep the heat gun moving – unless you like the smell and look of singed fabric!
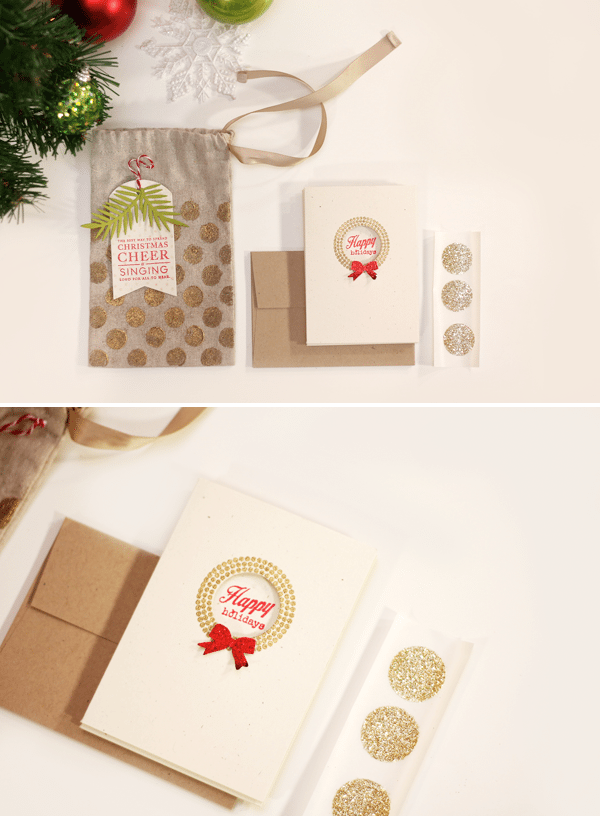
Project Specs: Bag measures 7.5″ x 4.5″ with 4bar card set
To keep the “Brown Paper Swag” going I created a simple stationery set using neutrals and gold. The wreath image is from Paper Smooches Potpourri set, which is one of my Start Your Stash Must Haves. I added a glittery bow and included some simple glitter stickers which I punched from gold glittered wrapping paper.
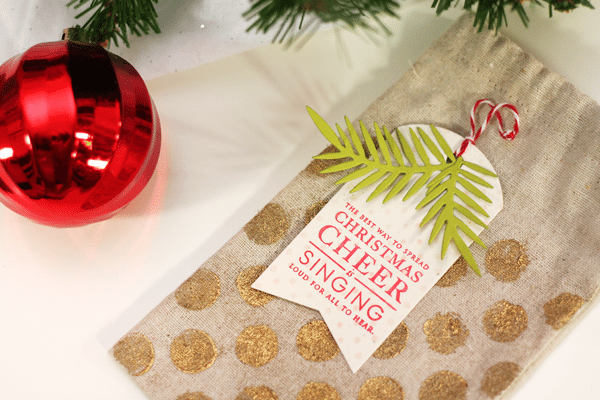
Once packed up, a tag adds a smidge of color to the neutral mix!
SUPPLIES
{TAG} Papertrey Ink Stylish Sentiments: Holiday | Papertrey Ink Tag Sale #6 | Dee’s Distinctive Dies Pine Sprigs | Papertrey Ink Simply Chartreuse Cardstock | Clear & Simple Stamps Circles Plus {CARD SET} Paper Smooches Reflections | Papertrey Ink Friendship Jar Holiday Fillers | Martha Stewart Bow Punch
So what do you think? Are you excited for some Brown Paper Swag?! Lord knows I love glitter, so I’m definitely looking forward to the upcoming projects!
- Have you entered the big mama Start Your Stash Giveaway?! Comments will close tonight at midnight, EST and the winner will be announced tomorrow!




Super results!!! Love this look. I wouldn’t have thought about embossing on fabric. I’m going to give this a try. It’s so gorgeous and what a wonderful way to dress up that little bag.
Oh, wow! This is FABULOUS!!! I would have never thought of using glue to emboss!! Thank you!
cool! I’d love to know the company the tag sentiment is from!
Hi Pam! I’ve updated the post with a full list of supplies for the tag and card set! Hope this helps!
Such a fun project!! I do have a question, tho—do you ruin your clear stamp with this glue method…how do you clean the stamp so you can use it again?
Nancy – really good question! The glue does not do any damage to the stamp. I was able to wash off the glue but just running it under lukewarm water. If for any reason the glue dries onto your stamp, you can just peel it off and then use the stamps as usual.
Glue stamping? I would never have thought of that! Such adorable burlap bags–can’t wait to try this!
Burlap is the kraft paper of fabric. I love the look of it when combined with other things. I love this as an envelope or box alternative for a set of cards.
Thanks for sharing the inspiration!
Wow. Very impressive.
Great idea!!
Gah!!!! you even made the bag! Fantastic technique – looks beautiful too 🙂
LOL! Yep – I made the bag but only because I ruined 3 store-bought ones as I was trying out this technique! In the end, I was forced to break out the sewing machine!
Lovely gift and packaging = a super gift!!Thanks for the inspiration!!
Ah, LOVE this! The bag is almost a gift in itself!
super LOVE
LOVE thissss! and LOL for your julie andrews joke…you’re so funnyyyyy…i always loveeeee your works :DDDD
If you’ve been thinking of moving your character to a different realm then now is the time to do it. This effect lasts until you have caused 3 critical strikes with fire spells. The Savior of Hallow’s End – Once per hour, the
Headless Horseman will attack one of the starting zones.
Excellent transaction. Will buy again. A+++++
How cute! How did you make the glitter stickers?
Good information. Lucky me I ran across your blog by accident (stumbleupon).
I have saved as a favorite for later!
Looking for expert guidance on protecting assets while qualifying for Medicaid? As experienced elder law attorneys near me, our team at Ohio Medicaid Lawyers provides specialized legal assistance with Medicaid planning, estate planning, and asset protection strategies. We help seniors understand medicaid eligibility income charts and navigate the complex 5-year lookback period. Visit our website for comprehensive information about Ohio medicaid income limits 2024 and schedule a consultation with a trusted elder care attorney who can safeguard your future.