The votes are in and the battle between donuts & balloons has a winner. Donuts.(If you have no clue what I’m talking about, check out last night’s post on the Damask Love Facebook Page!)
Today’s project is embarrassingly simple, which means I will accept zero excuses for not running and making a pile of these…stat!
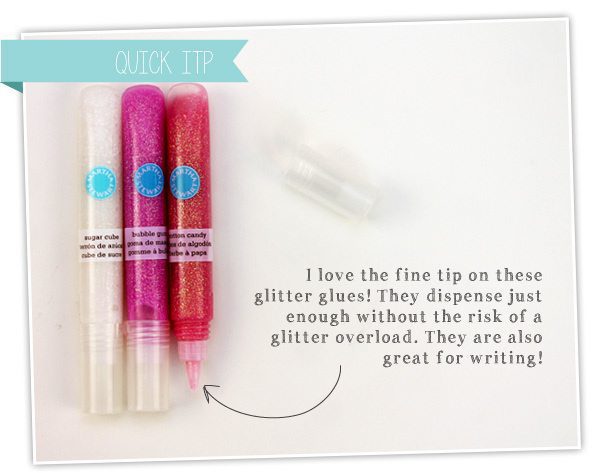
As you probably already know, every month I bring you a little dose of Martha Stewart crafting along with the rest of the 12 Months of Martha blogger team. Currently, I am mildly obsessed with the Martha Stewart Glitter Glue which is leaps and bounds better than other glitter glues out there. The fine tip gives you lots of controls the high glitter concentration means you get plenty of sparkle. Ok…commercial over…let’s make something.

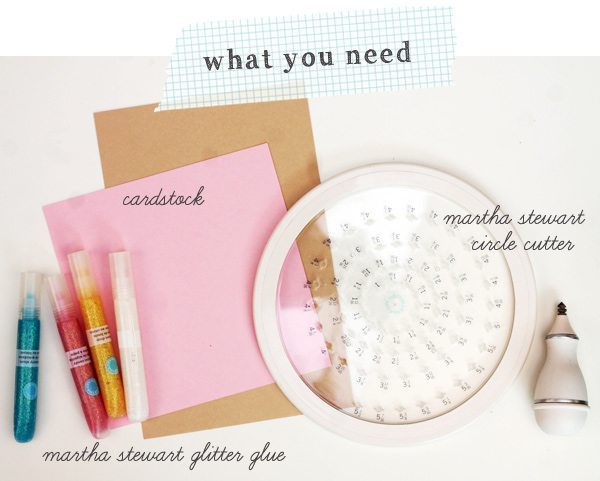 Yep – that’s it for the supplies. Just three things…well…I guess you’ll need a pair of scissors, but I’m sure you have those floating around the house.
 {1} Use the circle cutter to cut a 1″ circle in the center of your cardstock, then, WITHOUT moving the circle cutter, cut again at the 4 3/8 notch.
{2} Repeat step one on a piece of light pink cardstock (or the color of your choice)
{3} On the pink cardstock, use scissors to cut a wavy outer edge
{4} Use a makeup sponge and a brown inkpad to gently apply brown shading to the edge of the light brown cardstock. This step is optional but gives your paper donut a freshly baked look.
{5} Adhere the “icing” to the “donut”
{6} Use glitter glue to add sprinkles and allow the glitter glue to dry for 30-60 minutes.

 I created 5″ square envelopes for my donut valentines and inserted a bag of candies into each one. On the back of each donut, I stamped the perfect sentiment. When it’s all said and done, I’ve got an adorable valentine in just a few minutes.


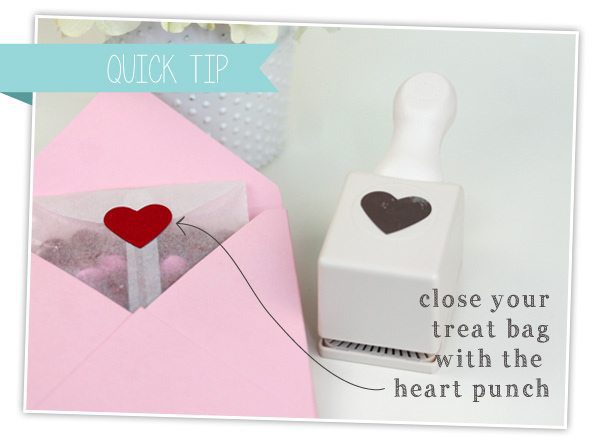


Martha Stewart Circle Cutter | Martha Stewart Glitter Glue 24 Pack | Martha Stewart Iridescent Glitter Glue 12 pack | Martha Stewart Heart Punch | Envelope Punch Board | Have a Donut Stamp Set


cricut.com/setup helps new users bring their Cricut machine into use with clear and simple steps. It explains how to connect the device, install the Cricut Design Space software, and prepare the machine for the first projects. This guide works great for people who want to start crafting without Cricut setup delays. Once finished, Cricut users can enjoy smooth cutting, drawing, and design work for home crafts, gifts, and creative projects without repeated setup issues.
Many craft lovers visit cricut.com/setup to activate their Cricut machine and install the required Design Space software. The site walks you through connecting your Cricut to your PC or smartphone. It also helps you check compatibility and finish the connection process smoothly. After the setup process, you can create stickers, greeting cards, earrings, tote bags, and personalized gifts. A correct installation gives you confidence and prepares your Cricut machine for regular creative work.
When you buy a new Cricut machine, cricut.com/setup helps you get started quickly. The page guides you through creating a Cricut account, downloading the Design Space app, and connecting your device. It explains each step clearly so you can avoid setup problems. Once your Cricut machine is ready, you can begin cutting vinyl, cardstock, paper, leather, or fabric for custom projects. This starting point makes it easy for beginners to move from unboxing to creating in a short time.
For first-time Canon printer users, pixma printer setup provides step-by-step setup guidance. The page helps you download the correct driver software, connect the Canon printer to Wi-Fi, and complete the installation process. By following the steps carefully, you can avoid common errors during setup. Once finished, your Canon printer is ready for documents, photos, and school projects. This official setup page makes the installation process simple.
Small business owners often visit rollo.com to learn more about Rollo label printers and their features. The website shares product information, driver software downloads, and easy steps for setup. Whether you print shipping labels from home or manage bulk orders, the site helps you understand how to use your Rollo printer correctly. Apart from that, it provides solutions for printing errors and connection issues, so you can stay focused on packing and shipping without delays.
Many crafters search for the Cricut Explore Air 2 download when setting up their cutting machine for the first time. Installing the correct Design Space app allows the Cricut Explore Air 2 to connect with your PC and begin cutting designs accurately. After the setup process, you can upload artwork, select materials, and send projects to the Cricut cutting machine. This makes it easier to create home decor, labels, custom gifts, and many other craft items. Proper installation helps the Cricut Explore Air 2 work smoothly for everyday creative projects.
Learning how to connect canon printer to laptop helps you start printing files quickly from your computer. The process includes installing the correct driver and linking the Canon printer through Wi-Fi or a USB cable. Once the setup is complete, your laptop can send documents, images, and reports directly to the Canon printer. This connection works well for students, home users, and office tasks where reliable printing from a laptop is needed every day.
If you own a rollo printer labels, rollo.com is a useful place to learn more about setup and device features. The website provides product information, driver downloads, and helpful instructions for connecting your Rollo printer to a computer. It also has support articles for fixing printing problems and improving label quality. By visiting the official site, users can keep their Rollo printer updated and running smoothly for daily shipping and label printing tasks.
If you want to start crafting on your computer, the cricut design space download for windows 10 helps you connect your Cricut machine with your PC. After installing the program, you can create and edit designs, upload images, and prepare projects for cutting. The Design Space software works with many Cricut models and supports various materials such as vinyl, paper, and cardstock. Once installed, Cricut users can easily organize projects and begin making stickers, wooden signs, greeting cards, or custom designs on their Windows device.
The driver for the Canon TR8620 Printer Driver allows your computer to communicate with the printer for smooth printing, scanning, and copying. Installing the correct driver ensures the printer works properly and delivers high-quality results. You can download and install the latest driver from Canon to keep your printer running efficiently.
cricut design space download for windows 11 helps users bring their Cricut machine into use step by step. The website shows how to create a Cricut account, install Design Space, and connect the device properly. It works well for beginners who want simple instructions. After setup, Cricut users can design and cut different materials for creative projects. A proper start helps avoid errors and keeps your Cricut machine ready for regular use.
If you use a Rollo label printer for shipping or business orders, rollo.com is the right place to start. The site provides access to Rollo printer details, setup instructions, and helpful support articles. New users can find guidance for installing the Rollo printer and connecting it to a computer without confusion. Also, it offers updates and answers to common printing questions. Visiting the official site helps you keep your Rollo printer running properly for daily label tasks.
Small business owners often visit rollo.com to understand how their rollo printer works. The site offers details about label printing, installation steps, and software downloads. It also includes answers to common questions about printing speed, label alignment, and connection problems. By following the guides available on the website, Rollo users can keep their shipping process organized. The official Rollo page is a useful resource for everyday label printing.
When setting up a new Cricut machine, cricut air 2 software provides the steps needed to begin quickly. The page guides users through creating a Cricut account, installing the Design Space app, and connecting the Cricut machine to a computer or phone. Once the setup is complete, you can start preparing craft projects such as custom cards, earrings, wooden signs, tumblers, tote bags, and more. Using the official setup page helps ensure the Cricut machine works correctly from the start.
Many users visit canon ts3522 setup to complete their Canon printer setup without technical trouble. The website guides you through installing drivers, connecting to Wi-Fi, and checking the Canon printer status. It also helps fix common issues during Canon printer setup. Whether for home use or office work, the instructions are easy to follow. Once the process is complete, your Canon printer is ready for regular printing tasks without connection problems.
If you just purchased a Cricut machine, cricut.com/setup helps you begin the installation process. The web page shows download cricut design space app, create an account, and connect your Cricut machine to a computer. These steps prepare the Cricut machine for cutting and crafting projects. Once the setup is complete, Cricut users can start designing paper flowers, tote bags, mugs, bookmarks, wooden signs, and more. The official setup page helps beginners get their Cricut machine ready for creative work.
For anyone setting up a Rollo label printer, rollo.com provides useful instructions and support. The site explains how to install drivers, connect the Rollo printer to a computer, and start printing labels. It also offers tips to improve printing quality and fix small errors. These resources help sellers handle shipping tasks without delays. Checking the official Rollo website gives users confidence that their Rollo printer is configured correctly.
Many new users rely on cricut.com/setup to prepare their Cricut machine for the first project. The website explains how to download the required Design Space software and link the Cricut machine to your operating system (computer or phone). It also guides you through Cricut download setup and connection checks. Following these steps helps avoid setup errors. After installation, you can begin working on craft ideas such as decals, greeting cards, tumblers, stencils, and custom gifts with your Cricut machine.
Cricut Explore Air 2 download allows you to install the free Cricut Design Space software needed to run your machine. Simply download, install, and connect your device to start cutting vinyl, paper, cardstock, stickers, and more. With quick setup and easy tools, you can begin creating DIY projects in minutes.
you are setting up a Canon printer for the first time, ij.start.canon offers clear instructions to begin. Users can select their Canon printer model and download the required driver software. The page also explains how to connect the Canon printer to a Wi-Fi network and confirm the connection. This makes the setup process simple, even for beginners. Starting from the official Canon page helps ensure the Canon printer works correctly.
If you use a Rollo label printer for shipping, rollo.com is a helpful place to learn more about the device. The website provides product information, setup guides, and driver downloads. Users can also find helpful articles that explain how to fix printing problems or adjust label settings on a Rollo printer. This makes it easier for online sellers and small businesses to manage their printing tasks. Visiting the official Rollo website helps keep your Rollo label printer working smoothly.
If you want to install or reconnect your Canon printer, canon printer wifi setup offers a reliable place to begin. The page provides drivers, setup instructions, and guidance for wireless and wired connections. Users can follow simple steps to prepare the Canon printer for desktops, laptops, or mobile devices. These instructions help reduce confusion during installation. After finishing the process through the official Canon setup website, the Canon printer is ready to handle documents, photos, and regular printing tasks.
Learn how to setup cricut explore air 2 with this easy step-by-step guide for beginners. Discover how to set up your machine, connect it to your computer or phone, and start creating beautiful DIY projects like stickers, cards, vinyl decals, and more. This complete guide will help you understand the basics of Cricut Design Space, choose the right materials, and get perfect cuts every time. Whether you are new to Cricut or want to improve your crafting skills, this tutorial will make the Cricut Explore Air 2 simple and fun to use.
Learn how to setup cricut explore air 2 with this easy step-by-step guide for beginners. Discover how to set up your machine, connect it to your computer or phone, and start creating beautiful DIY projects like stickers, cards, vinyl decals, and more. This complete guide will help you understand the basics of Cricut Design Space, choose the right materials, and get perfect cuts every time. Whether you are new to Cricut or want to improve your crafting skills, this tutorial will make the Cricut Explore Air 2 simple and fun to use.
If you want to install or reconnect your Canon printer, canon printer wifi setup offers a reliable place to begin. The page provides drivers, setup instructions, and guidance for wireless and wired connections. Users can follow simple steps to prepare the Canon printer for desktops, laptops, or mobile devices. These instructions help reduce confusion during installation. After finishing the process through the official Canon setup website, the Canon printer is ready to handle documents, photos, and regular printing tasks.
New Cricut users often begin with the cricut explore air 2 software to complete their Cricut machine setup. The website explains how to download the Cricut Design Space software and connect the machine properly. It also helps confirm that your Cricut machine is ready before cutting any material. Following these simple steps helps avoid machine setup mistakes. Once everything is ready, you can work on different craft ideas like vinyl designs, custom gifts, and decorative items for home use.
When installing a Canon printer on a computer or laptop, Canon PIXMA TS9520 Printer offers helpful guidance. The site provides driver software downloads and explains how to complete the setup step by step. Users can also learn how to connect the Canon printer to their wireless network and confirm the connection. These instructions help make installation simple for new Canon printer users. After finishing the setup through the official page, the Canon printer is prepared for daily printing tasks.
Setting up your Cricut machine is simple when you follow the instructions from cricut setup explore air 2. The page provides guidance for installing Design Space software and connecting the Cricut machine to your computer or smartphone. Apart from that, it helps confirm that the Cricut machine is ready before starting a design. These steps make the Cricut process easy for beginners. After setup, you can create various craft projects with confidence and continue using your Cricut machine without problems.
connect canon ts3522 printer to wifi becomes easier when you use ij.start.canon for guidance. The site includes driver downloads and instructions for wireless and wired connections. Plus, it provides steps to complete the installation without confusion. Users can follow the process on laptops or mobile devices. After setup, the Canon printer is ready for regular printing tasks, making daily work simple and smooth.
If you bought a brand-new Cricut machine, cricut.com/setup helps you prepare it for use. You can download the cricut explore air 2 download, sign in to your account, and connect the crafting machine to your device. The process works for desktops, laptops, tablets, and smartphones. Once setup is complete, you can start creating custom crafts for school projects, home decor, or small business items with less effort.
The Cricut Explore Air 2 driver is designed to connect your Cricut machine to a Windows or Mac PC efficiently and reliably. It allows your Cricut machine to communicate with Cricut Design Space accurately to achieve a clean and precise cut or project. Updating your Cricut Explore Air 2 driver provides better speed and reliability and helps troubleshoot any connection errors, allowing both USB and Bluetooth connections to be established easily. This driver is ideal when you are designing and cutting vinyl decals, cards, stickers and general crafting projects.