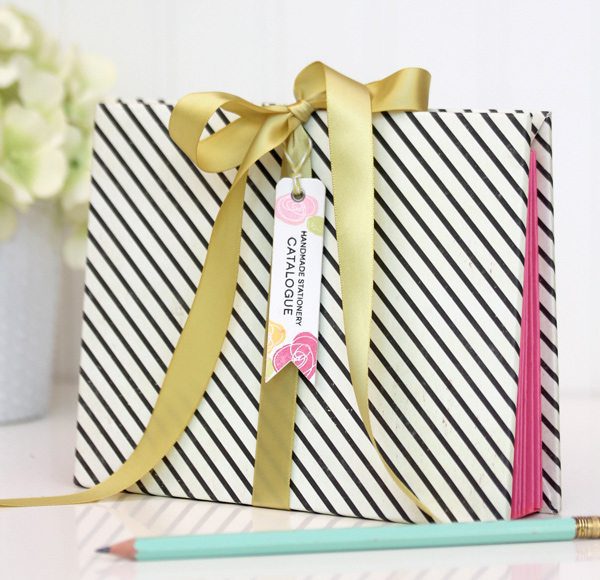
I have more cards than I could possible send in twelve lifetimes.
In the craftroom, I have a box that I call “Hallmark.” It’s overflowing with handmade cards that I’ve created over the years and whenever friends come over, I tell them to go shopping at “Hallmark” and pick out some cards for their own stash. It’s a great way to pare down my collection and send them off to a good home.
With so much stationery around here, I’ve long wanted to come up with a creative and simple way to keep it organized…a system for categorizing some of my cards, making it easier to find them and actually put them to use (instead of letting them pile up).
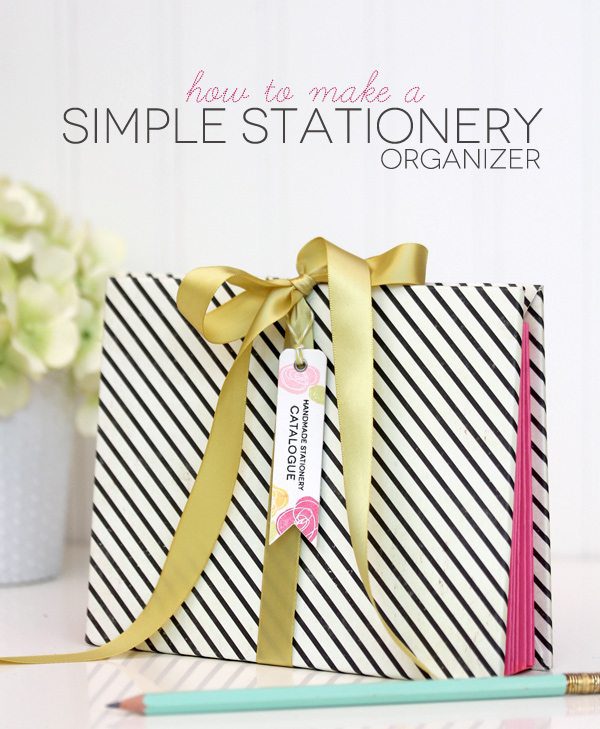
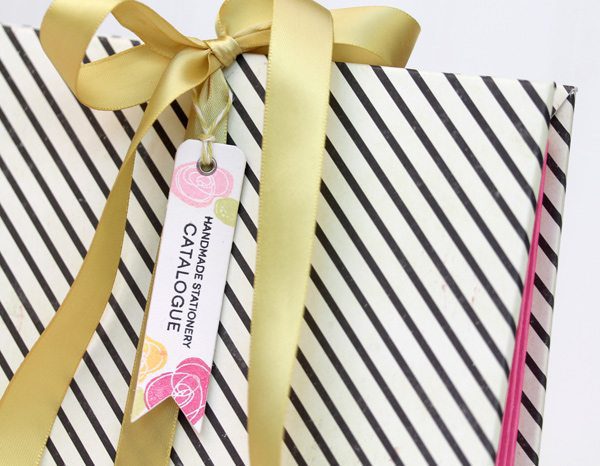
Today, I’ve got a really simple tutorial featuring the File It stamps and dies from Clear & Simple Stamps, which are perfect for a project like this. The tiny words and file tab dies are great for customizing organizational projects.
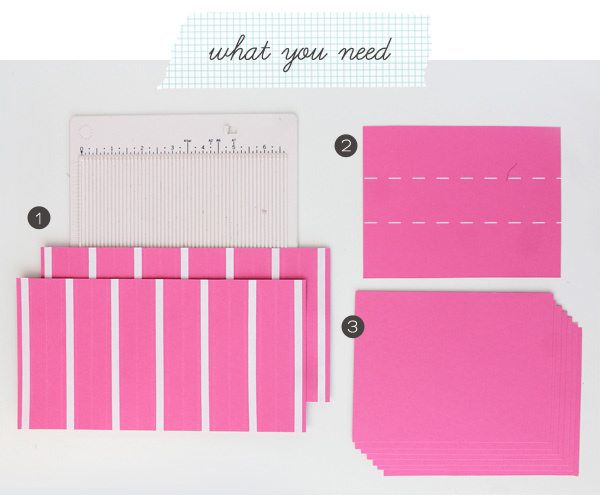
{1} 5″ x 10″ colored cardstock scored at 1/2″ intervals with 1/4″ Simple Adhesive placed on every fourth section
{2} Colored cardstock cut to 6.5″ x 5″ scored as shown at 1.25″ and 3.75″
{3} 7 additional pieces of colored cardstock cut to 6.5″ x 5″, unscored
{4} Not Pictured: Two pieces of bookboard or very thick chipboard cut to 7″ x 5.5″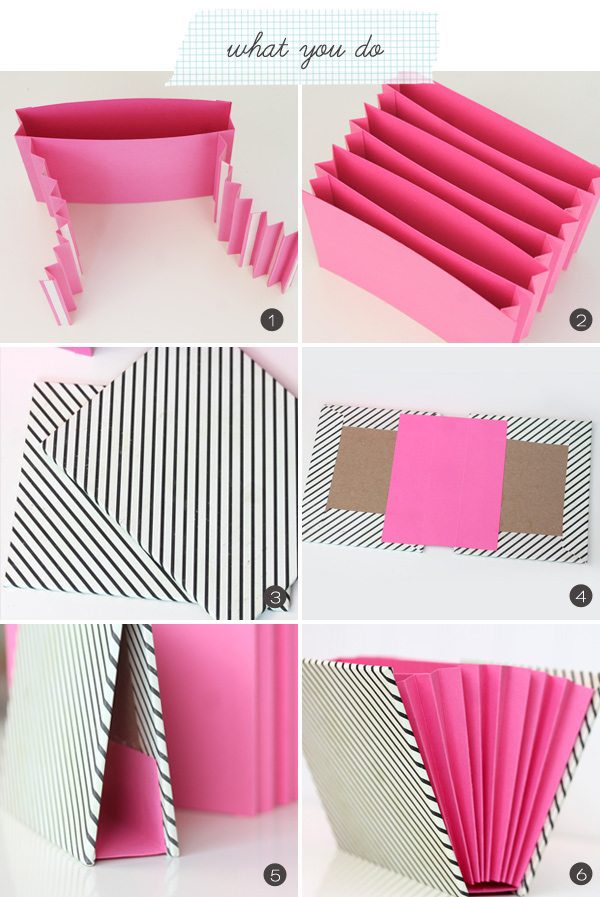 {1} Fold the scored cardstock accordion-style
{2} Adhere the 7 pieces of cardstock between the two folded pieces, as shown.
{3} Cover the two pieces of bookboard with your choice of patterned paper
{4} Attach the two pieces covered bookboard with the last piece of 6.5 x 5″ piece of cardstock
{5} Bring the two pieces of bookboard together as shown
{6} Adhere the accordion file to the inside of the bookboard pieces.
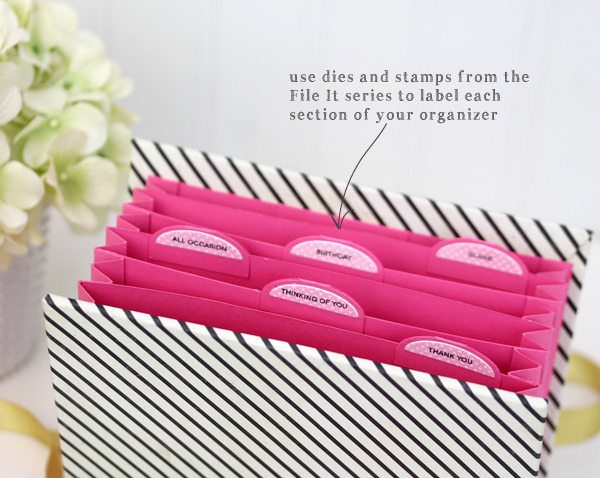
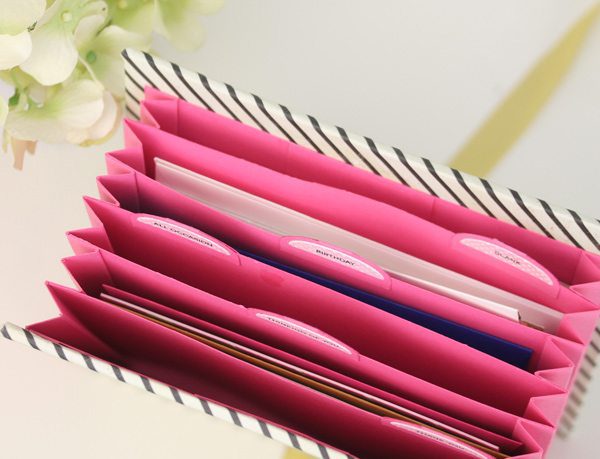
Once the file is assembled, you’ll want to add some details to the dividers to make it easy to categorize your stationery. The labels from File It: Stationery and the File It Die Collection worked great for this element of the project. If you’d like to add more dividers to your file, simply add more accordion folds. That way, you can have even more categories in your file.
How do you organize your stationery?
SUPPLIES
File It Stationery | Stationery Organizer Dies | Paint the Town Pink Cardstock | Flowers Stamp Set

So glad this went up today. I was just thinking about how to store all these cards I made over the past several months. They are currently being housed in a plastic shoe box from the dollar store. I put my order in already for the File It: Stationery stamps. I tell you, I’m going to get a lot of mileage from that one set alone. Thanks Amber for the inspiration!
Wonderful gift idea. Thank you so much!
Wow Ashley! This is amazing! With all of the cool accessories you show us I am not sure how you have time to make cards 😉
Thanks for sharing
Susan
You did it again Ashley! This is one of my favorite blogs! Love you style! Simple and sofisticated! Thank you for sharing!
Oh my gosh, your flair for creating incredible stationary is marvelous 🙂
Amber, this looks so pretty an easy! What a clever girl…I was a Hallmark shop-a-holic back in the day before I made my own cards. Haven’t stepped foot in one since, though I would give up my left foot to shop in your Hallmark!
P.S. you don’t look like an Ashley to me hahaha
Super fabulous idea.
What a great idea! I give lots of my cards away as a gift, especially to my mum who asks for them for mothers day etc. My adult children as always raiding the shop too, this would be a great way to pack them, and then they can refill them as needed. Beautiful work!!
Wow, that is gorgeous! I keep mine in a Martha Stewart “photo” box, and before that, in one of those cardboard photo boxes from Michaels. I call it my shoe box. It has tabbed dividers to organize cards by occasion. I take it with me to family gatherings, and my husband takes it to school because he has a few coworkers that are crazy for handmade cards. It helps subsidize my craft supply buying habit!
Hi Amber,
I’ve just found your lovely blog, via Pinterest. This project is adorable and would be great for greetings cards or a collection of pretty tags etc. for all kinds of occasions. I’m certainly going to enjoy popping back to read more of your posts.
Thanks for sharing to me here across the miles here in France.
Susanne
I’ve made it !
Wonderful
Thank you for the explanations !
Trying this asap! Thanks for sharing Amber! 🙂
omgosh. I love this and wish I had the paper and tools to make it.
Great job
I`ll try to do the sam
Testing out your comments
Bellissimo 😀
Wonderful! Great idea 🙂
hoe maak je dat eigenlijk want ik snap het eigenlijk niet zo goed.
mvg van evelien coppens en tot wederhoren.
I have been looking for a letter holder to organise my life, and thanks to your tutorial, I didn’t need to buy one, I made it! Although I deviated a little as I didn’t have any of the materials, so I made mine from materials I had lying around the house… take a peek: http://rosiemrogers.co.uk/2014/01/26/how-to-turn-an-old-folder-into-a-handy-and-cute-stationery-organiser/
I love this and it is a great way to package up some cards for my daughter. Hope to give this a try very soon.TFS
i have been looking for an easy steps diy organizer, and i’m so grateful i found one… thank you for coming up with this great idea…
lovely, perfect for a party girl
My spouse and I stumbled over here from a different web address and thought I might as well check things
out. I like what I see so now i am following you.
Look forward to going over your web page again.
Wonderful gift idea. Thank you so much!
Urška
Wonderful idea! 🙂 Something I must have 🙂
Love it. it is so cute
Hi Amber,
Please tell me you’d consider creating another one of these to sell to me? Pretty please, with a cherry on top!!?!
I am taking a screenshot of this so I have it at work to discuss with a coworker if she thinks my ideas for modifying it for fabric would work. I have been wanting a wallet with sections for money designated for different purchases.
Hi Amber! Great design! We thought it would be interesting to modify the dimensions to make a sturdy little coupon book for everyone’s Labor Day weekend! We posted the modifications on our blog site (with credit and link to your original design, of course!). Thanks for the great idea, and keep up the awesome work!
http://www.homeremodelingideasblog.com/wrapping-up-summer-crafts-and-tips-for-your-labor-day-weekend/
I’m so glad I’ve found this tutorial! I’m planning on making one of these but bigger for my daughters awards, report cards and art work! Thanks for sharing!