I guess I’m on a candy kick. Last week it was candy corn and today is a lesson is peppermint candy. Much like candy corn, I don’t particularly care for peppermints, but I can appreciate how cute they are, which is all that really matters, right?
Todays Easy Like Sunday Morning lesson is a little more “technique-y” than usual but I think y’all can handle it. No, I know you can! Chances are you already have the materials you need for this project so let’s get started because once you get the hang of this – you’re gonna love it. I promise.
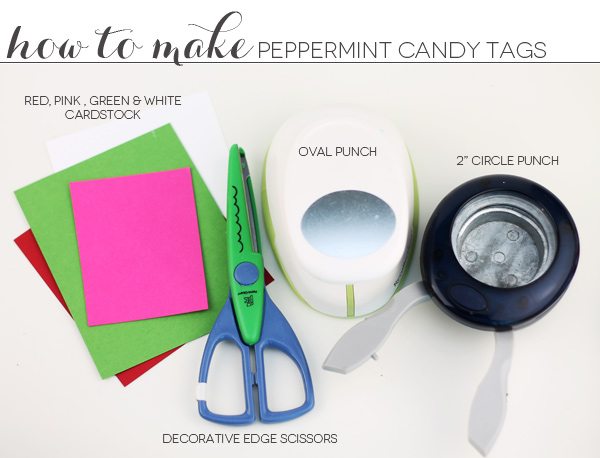
An important tip about supplies: For your sanity, you’ll wanna use a 2″ circle punch for this project. It’ll make your life a lot easier. You’ll also need a ruler, pencil – and if you have it – a self-healing mat that has a grid on it.
Now that we have the logistics figured out, let’s start the tutorial!
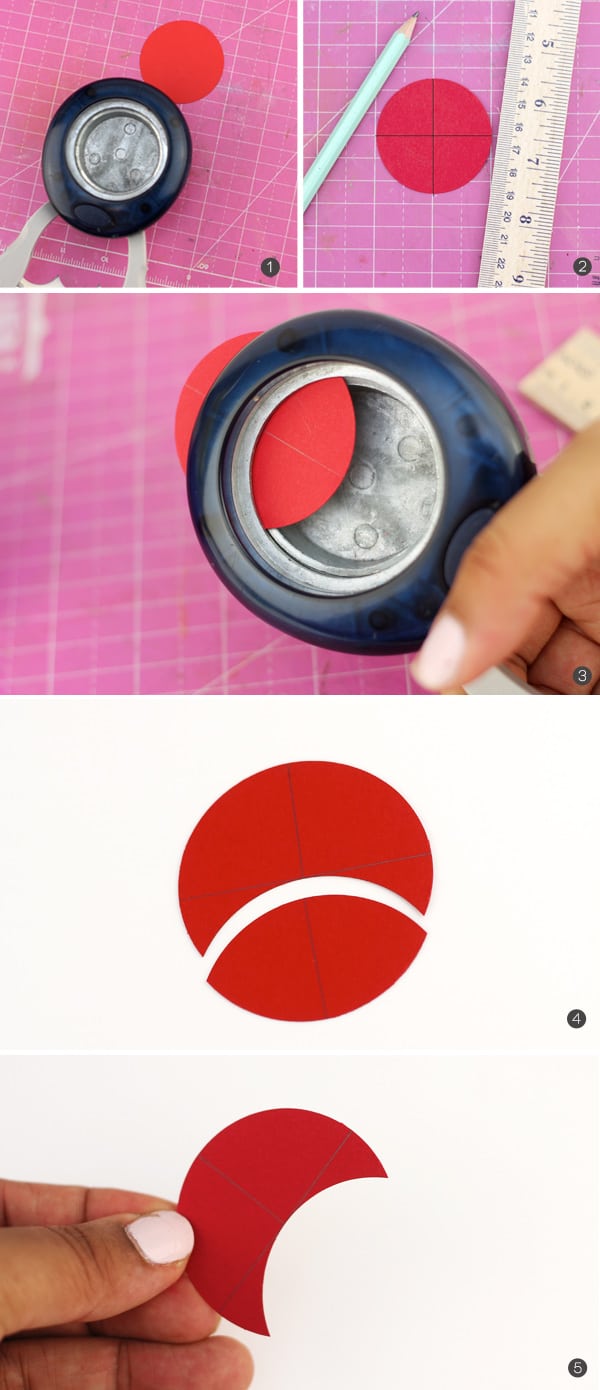
{1} Punch a 2″ red circle – simple enough, right?
{2} Now, use your ruler and gridded mat to draw lines down the center of the circle, which will divide the circle into four equal quadrants. Not too tough – it’s like you’re back in geometry class.
{3} This step requires a little attention – Use the circle punch and insert the circle as shown. You’ll want to punch the circle again so that the top of the circle punch touches the middle of the circle where the two lines cross. Make sense? If not…
{4}…this is what you should have when you complete step 3. Hopefully it makes a bit more sense now.
{5} You can discard the lower portion of the circle, we’ll only be working with the piece pictured.
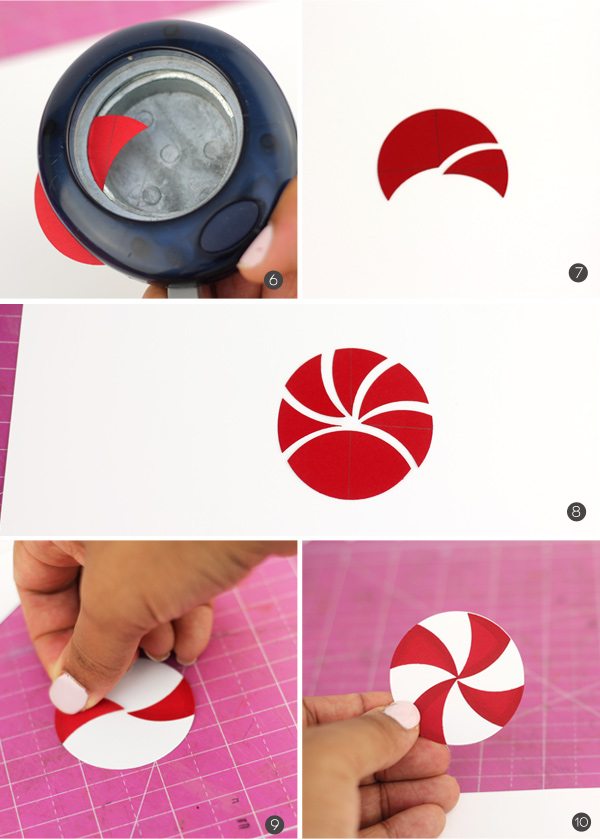
{6} Okay! You made it this far – you’re almost there! Now, insert the moon shaped piece into the circle punch as shown. You want to use the center of the circle (where your pencil lines intersect) as a guide. Your punch should pivot at this intersection.
{7}…see what I mean?
{8} Continue pivoting and punching using that center point as a guide, until you have four punches. It’ll look like this.
{9}PHEW! Did you do it? If so, you’re home free! Next you just have to punch a 2″ circle from white cardstock and adhere the red pieces as shon.
{10} Adhere all four until you get the look of a peppermint.
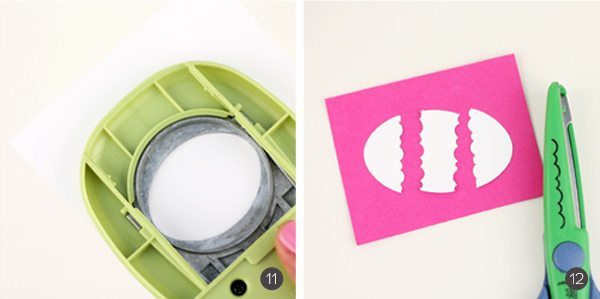 {11} Last up – punch a white oval…
{12} …then cut with the decorative scissors as shown. These pieces will be adhered to the sides of the peppermint with glue.
Have you stuck in there with me through this tutorial? I hope so! It definitely is a teensy bit more complicated that most Easy Like Sunday Morning posts but I know you can handle a challenge!
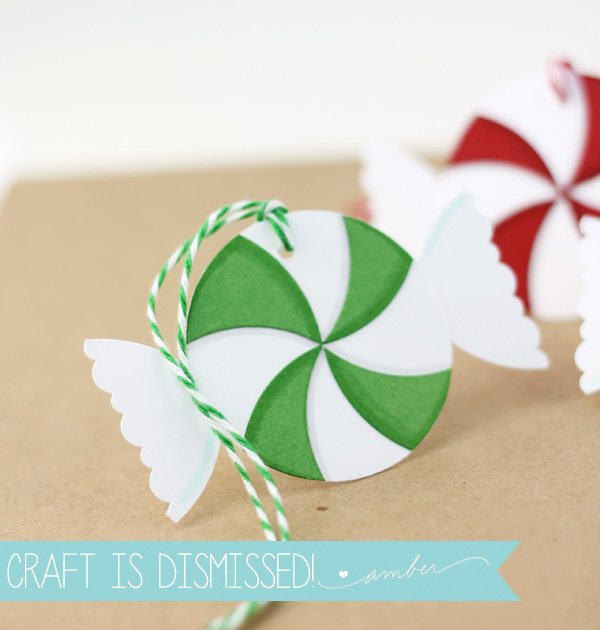 I’d love to hear from you on this project! Will you give it a try? Let me know!










Very cute!
Oh my goodness, Amber, you are so clever, and lovely, and creative!
I love this project, it is so very cute!
I love your blog. I’m going to make the Hershey kiss witch today. those look so cute!
Thank you, Amber!
Oops, meant i am making the candy corn project!
they are so cute!
HA – very cute 😉
What an adorable idea! Love it!
These are awesome Amber! And your tutorial is very well done, the pictures are great and you make it look easy. So I’m going to make some today! Thanks!
So sweet!!!!! Did u use a marker to shade the pieces? Can’t wait to try this. You are THE BEST AMBER;)
Genius!
These are absolutely DARLING!!! Can’t wait to try this out!!! Thanks for the inspiration!
Hi Amber,
Adorable tags! I am going to try some of these. I also noticed it looks like you highlighted the colored pieces. Did you use copics for that? Also, what is the name of that lovely “To From” stamp you used? Thanks so much for sharing!
So glad you like these! Yes, I did use copics to color a bit of the colored cardstock. It’s a simple shading technique that I use for a lot of the Easy Like Sunday Morning posts. For the “to/from” stamp – I used a stamp set from Papertrey Ink.
i absolutely love love all your designs. i will use this so much love it
Did you use copics for that? Also, what is the name of that lovely “To From” stamp you used?
reliable canadian online pharmacy
https://expresscanadapharm.com/# Express Canada Pharm
legit canadian pharmacy online
They always offer alternatives and suggestions.
get generic cytotec without prescription
They consistently go above and beyond for their customers.
I’ve sourced rare medications thanks to their global network.
can you get cipro without a prescription
Their patient care is unparalleled.
A pharmacy that takes pride in community service.
buy cheap clomid price
A pharmacy that truly understands international needs.
They provide international health solutions at my doorstep.
pharmacokinetics and metabolism of gabapentin in rat dog and man
A true asset to our neighborhood.
Yesterday, while I was at work, my cousin stole my apple ipad and tested to see if it can survive a 40 foot drop, just so she can be a youtube sensation. My iPad is now destroyed and she has 83 views. I know this is entirely off topic but I had to share it with someone!
Thanks a lot for sharing this with all of us you really know what you are talking about! Bookmarked. Please also visit my site =). We could have a link exchange arrangement between us!
Woah! I’m really enjoying the template/theme of this site. It’s simple, yet effective. A lot of times it’s tough to get that “perfect balance” between usability and appearance. I must say you have done a awesome job with this. Additionally, the blog loads extremely quick for me on Chrome. Outstanding Blog!
I will right away grab your rss feed as I can’t find your email subscription link or newsletter service. Do you’ve any? Please let me know so that I could subscribe. Thanks.
Hello there! This post couldn’t be written any better! Reading this post reminds me of my good old room mate! He always kept chatting about this. I will forward this write-up to him. Fairly certain he will have a good read. Many thanks for sharing!
It is really a great and helpful piece of information. I am glad that you shared this helpful information with us. Please keep us up to date like this. Thanks for sharing.
Good blog post. The things i would like to add is that computer system memory has to be purchased in case your computer still cannot cope with whatever you do by using it. One can deploy two RAM memory boards of 1GB each, for example, but not one of 1GB and one of 2GB. One should always check the manufacturer’s documentation for one’s PC to be sure what type of memory it can take.
obviously like your web site but you have to check the spelling on quite a few of your posts. Several of them are rife with spelling problems and I find it very troublesome to tell the truth nevertheless I will surely come back again.
Some tips i have observed in terms of computer system memory is there are specific features such as SDRAM, DDR or anything else, that must fit the technical specs of the motherboard. If the computer’s motherboard is rather current and there are no operating-system issues, updating the memory literally normally requires under a couple of hours. It’s one of the easiest computer upgrade processes one can visualize. Thanks for giving your ideas.
I was more than happy to search out this internet-site.I wanted to thanks on your time for this wonderful learn!! I undoubtedly enjoying each little little bit of it and I have you bookmarked to take a look at new stuff you weblog post.
Cool blog! Is your theme custom made or did you download it from somewhere? A theme like yours with a few simple tweeks would really make my blog jump out. Please let me know where you got your theme. Appreciate it
I was wondering if you ever thought of changing the page layout of your site? Its very well written; I love what youve got to say. But maybe you could a little more in the way of content so people could connect with it better. Youve got an awful lot of text for only having one or two pictures. Maybe you could space it out better?
Fantastic site. Plenty of helpful info here. I?m sending it to some pals ans also sharing in delicious. And certainly, thank you on your sweat!
Thanks for your strategies. One thing I have noticed is that often banks in addition to financial institutions have in mind the spending behavior of consumers while also understand that plenty of people max away their real credit cards around the breaks. They smartly take advantage of this fact and start flooding your own inbox along with snail-mail box by using hundreds of no-interest APR credit card offers shortly after the holiday season ends. Knowing that for anyone who is like 98 of the American community, you’ll jump at the chance to consolidate credit debt and switch balances for 0 apr interest rates credit cards.
I?ve been exploring for a little bit for any high quality articles or blog posts on this sort of area . Exploring in Yahoo I finally stumbled upon this site. Reading this info So i am glad to convey that I have a very good uncanny feeling I came upon exactly what I needed. I such a lot certainly will make sure to do not disregard this web site and provides it a look regularly.
I just added this site to my feed reader, excellent stuff. Cannot get enough!
I just added this webpage to my feed reader, great stuff. Can’t get enough!
The following time I read a weblog, I hope that it doesnt disappoint me as a lot as this one. I imply, I know it was my option to read, however I actually thought youd have something interesting to say. All I hear is a bunch of whining about one thing that you can repair when you werent too busy searching for attention.
very nice publish, i definitely love this website, keep on it
Generally I don’t read article on blogs, but I wish to say that this write-up very forced me to try and do so! Your writing style has been amazed me. Thanks, quite nice article.
Amazing! This blog looks just like my old one! It’s on a completely different subject but it has pretty much the same page layout and design. Superb choice of colors!
A pick and pack warehouse should stay organized so workers don’t waste time searching for items. I wanted to see an example of how this setup is explained in a simple way. That’s when I saw https://pnwwarehousing.com/e-commerce-fulfillment/ and looked through their details. They describe the workflow plainly, which helps you understand how they handle order volume. A clean warehouse layout keeps the process running on time. And when packing stays steady, shipping does too. It’s not complicated, but it makes a big difference for daily work. Good structure keeps mistakes low.
Geometry Dash is a fast-paced rhythm platformer that challenges players with precision-based gameplay and energetic soundtracks. Known for its unforgiving difficulty and addictive design, the game has expanded into several versions to suit different play styles and accessibility needs.
PicsArtOnline.net offers a fast, browser-based editor designed to make photo enhancement and creative design easy for everyone. With intuitive tools and powerful effects, it lets users transform images and create unique visuals in just a few clicks.