I have no business being around power tools. It is a recipe for lost appendages. The thought of a table saw makes me want to grab some gauze and a tourniquet. This is precisely why I am here to share some ideas for craftroom organization …sans power tools.
I’m not gonna lie – I am envious of other crafters with handmade cabinetry and storage with all sorts of fancy schmancy moulding and whatnot. It looks so purty. But let’s be honest, that is just not going to happen in this house. Unless the little man in the Ikea booklet is going to tell me how to assemble it – there is no construction happening in this home.
For the next few weeks, I’ll be bringing you my ideas for creating cute & functional organization for your craft supplies using your power-less tools.
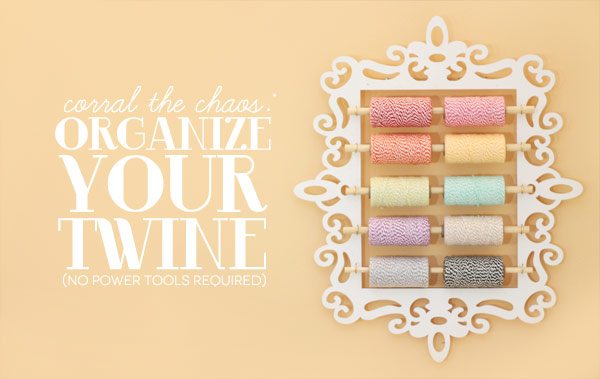
First order of business, the pile of baker’s twine spools that took up residence in the middle of our floor. Very pretty to look at. Very messy. Very annoying to husbands who don’t quite understand the awesomeness of baker’s twine. One day, he will learn.
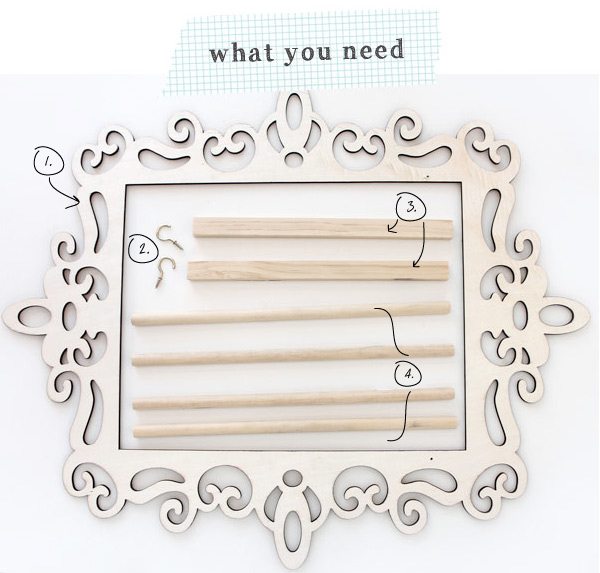
{1} Laser cut frame from Michaels – they carry several shapes and sizes of these awesome frames!
{2} 1″ Brass Plated Cup Hooks – you will need 10 of these for this project. I purchased mine at Home Depot in packages of 3.
{3} Square dowels. These are available at Home Depot in the same aisle as traditional circular dowels.
{4} 1/2″ circular dowels
{5} Small nails (not shown)
Additional Tools: Hammer, Hand saw, Spray Paint (optional)
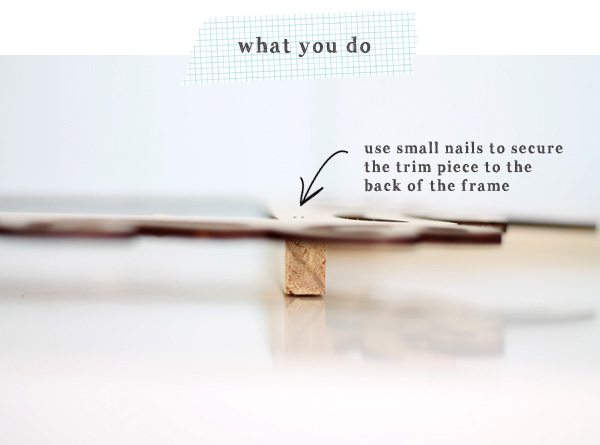
{1} Saw the square dowel down to be slightly smaller than the width of the frame. If you do not own a saw, you can ask the nice people at Home Depot to do this for you and they usually are happy to help.
{2} Nail the square dowel into place as shown above.
{3} Spray paint the frame in any color you wish (optional)
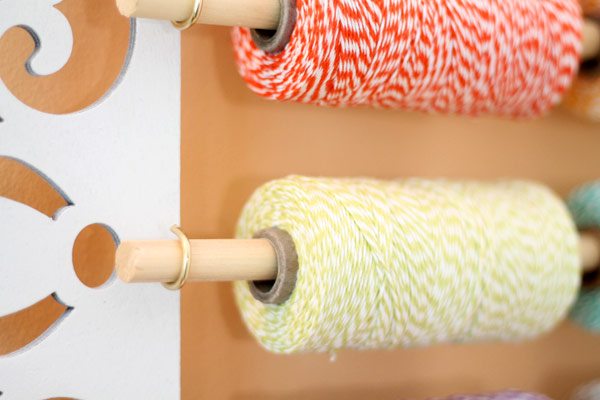
{4} Screw the cup hooks into place on either side of the frame. I was able to do this with my hand and some elbow grease! You’ll want to measure the distance between each hook before screwing them into place , to be sure they are all even.
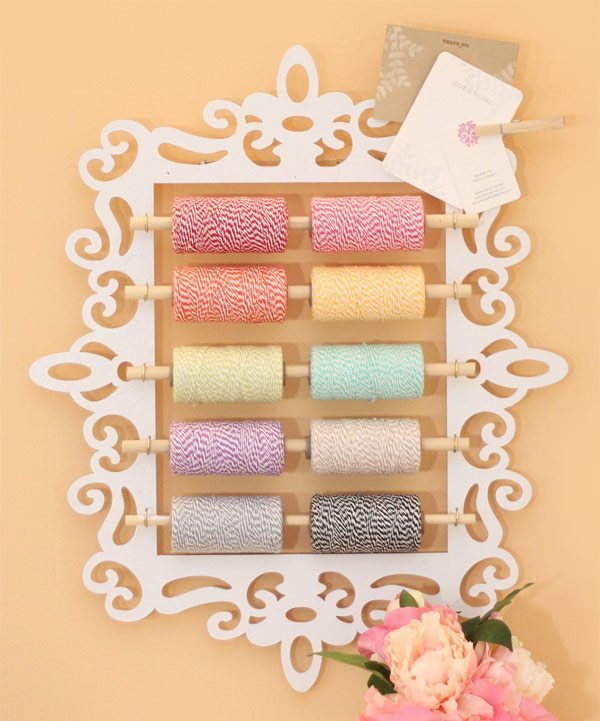
{5} Saw the circular dowels down to be slightly longer than the width of the frame opening. Slide dowels into place on the hooks and add spools of twine.
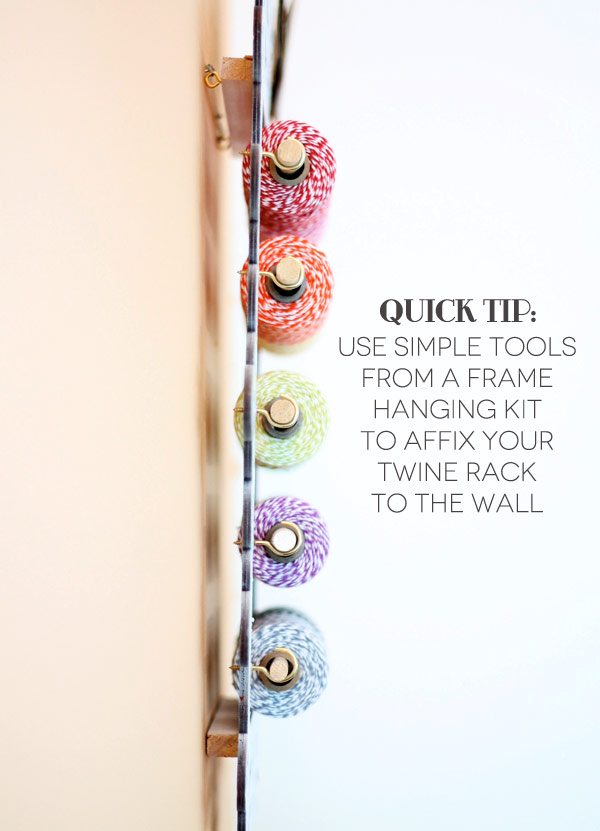
Once you hang your frame on the wall, you’ll see just how useful those square dowels are to making this functional. Without the dowels on the back, the frame would be flush to the wall and the spools would not have room to rotate.
My twine rack does double-duty by also holding a few flat notecards and business cards that I can grab quickly when I need to.
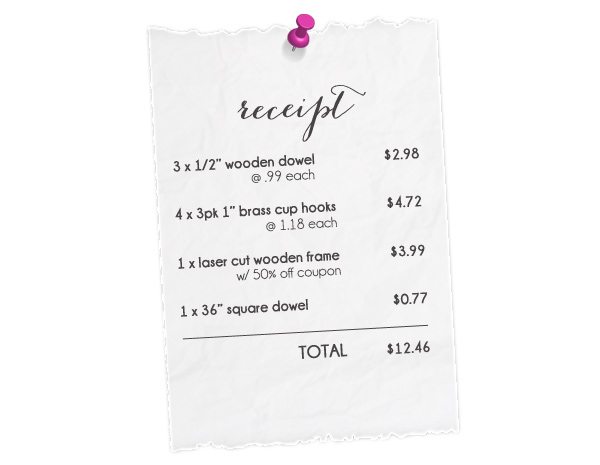
Oh…and before I go…did I mention how inexpensive this project was to create?!
I’d love to hear your thoughts on this project along with your own craft supply organizational needs! What would you like to see in upcoming posts? Personally, I need something that will organize all my envelopes! They are all over the place!!!





Love this! I’d love to see how you organize your dies.
Laura! My dies are a HOT MESS! I need to come up with something to organize them, because the current “throw it in a basket” technique is just not working!
I’m very new on the die scene. I knew that if the dies were not organized, I wouldn’t use them. I adapted storage ideas from a few people and the result works great for me. I bought a sturdy binder and some magnet strips. After 3-hole punching some cardstock, I taped the photo from the die packaging on the front of the paper. On the back is magnetic strips in a cross shape (or small pieces for shapeabilities). I have a few sections in my binder – nestabilities, shapeabilities, etc. .easy to find what I want and they all seem to be staying put.
It’s so pretty! I love that the spools are removable, or can be used right on the wall. I like to see solutions for organizing pretty much everything. Right now my adhesive collection is a hot mess. Glues, glue pens, glue dots, foam dimensionals, tapes, tape runners, xyrons, plus all the refills, gaaaahhh! And you know we need them ALL. (At least most of them, anyway…)
AMEN! You’d think that at a point, you’d feel like you have enough adhesive…NOT ME! I could reattach a car bumper with all the adhesives in my craftroom!
Loving this!! I just saw that frame at Michael’s today!! I love what you did with this! And, man—all that twine. It’s so perfectly rolled up. What’s your trick for that?
I actually took this photos right after i removed the spools from the box so they were brand new. Now that I’ve used some its not nearly as neat, but it still looks pretty.
I’d use the frame design openings near the end to corral the end of the bakers twine.
Love the spool organiser!! Would love to see an envelope storage!!!!
I think I’m going to tackle envie storage next! Good to know I’m not the only one who needs to corral the chaos of envelopes.
Well aren’t u just Nelly Snelly good. Look at u and your fancy twine holder. LOL I am loving it. Keep it comin baby.
HAA! Nelly Snelly? Can that please be my new nickname?
AWESOME, would like to see how do you organize your dies and stamps
I wish I could say that I have an amazingly creative way of storing my stamps…but I don’t! Definitely on the list of projects to tackle!
I did a wall of stamps. 2 inch plywood strips and small L brackets.
So pretty, Amber. What a great way to display the twine. Mine are all bunched up in a plastic drawer.
Ahhh – the ol’ ‘jam-it-in-a-drawer” technique! I know it well…very very well.
Very clever, Amber. Love the way you see unique possibilities in raw materials. I saw those adorable frames too, and couldn’t come up with one single thing to use it for. Thanks for the inspiration!
I was the same way! I actually bought this frame months ago with no plan for it …just thought it was pretty. Eventually this idea came to me!
This is darling! I’d love a way to be able to organize the RIDICULOUS amount of embellishments I have so that I can find just what I’m looking for.
OMG! You are reading my mind. I cannot TELL you how many adhesive rhinestones I have found stuck to the sheets in our bed. Something must be done about these runaway embellishments, RIGHT!
This is such a pretty way to store twine!
Pretty & Functional – a win, win, right!? LOL!
What a fun and pretty way to store twine!
Great idea to keep twine on hand. Pretty decor to color your room, too. Thanks for sharing. I am going to to have to make one.
YEAH! Don’t you love that you get to enjoy all the prettiness of the twine without hiding it in a drawer!
Very clever and such a pretty result!
Too cute! Functional & elegant at the same time! Gotta go get some of those frames.
Go get one! They have a ton of different styles to choose from.
Fabulous project. I love how inexpensive yet stylish it is. Can’t wait to see all the other ideas you have to share.
All the best,
Shelly
Inexpensive is always the best option!! thanks for your comment!!
This is a fabulous idea! Love it! It looks so easy and oh so cute.
Fabulous idea – Not much of a twine gal but love this idea – clean and organized. TFS
Jess – one of the Damask Love Facebook followers just suggested that this could be a great way to organize washi tape! So – if twine isn’t your thing, there are definitely other options!
How would you modify your bakers twine holder for washi tape that is larger in diameter?
Looove your creativity and this way-too-cute project. Love DIY, too, and all that yummy baker’s twine from The Twinery! Kinda crushing on your blog and blog design, too!
Thanks, Monika! I wish I could take credit for the blog design! I worked with some majorly talented folks to get this done. Thanks for visiting and commenting!
What a lovely idea Amber, it’s not only functional but super pretty as well. thanks for sharing your awesome ideas. I’d like to see a DIY way to organize my ink pads. Thanks again! Love all you do.
Good lord girl, you’re so clever. Come to my house and organize my craft room please.
Gorgeous, inexpensive, easy to use – what more could one ask for? Great idea Amber.
Maybe I only have this problem since I’m so cheap – but what do you do with little scraps of paper and die cuts (the positive when you’re using the negative, etc)? They collect in a pile on my ironing board and I’m constantly moving the pile from right to left and back again…
GIRL! That is not called cheap! That is called resourceful and I am right there with you! I always save the paper after die cutting. It comes in handy when I’m making die cuts of small shapes and need just a small scrap of paper. I like the idea of coming up with an easily accessible way to organize small scraps. My wheels are spinning on that one.
well this isn’t perfect but it works for me. I have two bins about 8×10. Think shallow dish pan from the plastics aisle. They actually fit on ‘inbox’ style stacking paper trays from an office supply store. One bin is labeled Paper and one is labeled Cardstock. They live behind the closed doors of a fairly accessible cabinet near my workspace. I just throw them in the right bin, no color sorting or size sorting. I do use them in cards, but my grandson also knows that anything in those bins is fair game for punching. He loves to play with my hand punches and make a big mess on the floor.
You “nailed” this! Well done! Keep the ideas coming! I like storage solutions that don’t include plastic.
Gosh, I am ever-inspired by every post you have on your blog! Love, love, love!!!!
Amber – I’m fairly new to following you, but I must say “You ROCK!”. Your posts lately have just been amazing and this one does not fail. Can’t wait to try this is weekend!
Hi Amber,
I really love this idea! I’m so glad it’s cheap and easy, too!
In your response to the first post, you said your dies are a HOT MESS! Well, I finally broke down and bought the Artbin magnetic storage (for wafer/thin dies) and I LOVE it! I got mine here: http://www.amazon.com/ArtBin-6978AB-Spellbinder-Magnetic-Case/dp/B007Q41MO6
If you do a google search, lots of places carry them.
I keep my envelopes in a large storage box, labeled by size, then color…I would love to see more of your clever ideas. Thanks so much for sharing this with us 🙂
You are a genius, girl!! I have no wall-space left in my tiny crafting corner, otherwise, I’d be all over this project!
THANK YOU!!!!
This is so amazingly cute and the perfect pretty display for your Baker’s twine!
What a great, and good-looking, idea! Thanks! “Pinned”
This is getting pinned! Love it and can’t wait to make one! I only have a couple spools of twine (the rest are samplers, so not on a spool), but could fill it up with my ever-growing collection of washi tape! Thanks for sharing your genious-ness (word?) with us! I’m looking for the “perfect” containers for 6×6 paper pad storage…any ideas on that one?
What a clever and beautiful solution for twine storage! Can’t wait for your envelope solution! Thanks for sharing and have a great day!
This is super cool! I just saw you were on the retreat list. I hope you can make it. I’d love to meet you.
Hi Amber, i Love this awesome idea 🙂 one of the best idea I have ever seen for organizing twines. I wonder if it fits bigger spool of twines? Might be too heavy eh? Would love to see how you organize your scraps and embellies 🙂
I’m sure you could design something that could hold larger spools of twine, you may need to choose thicker dowels and larger cup hooks. You’d also likely need to get larger square dowels that increase the distance between the wall and you spools. I say give it a try!
Man, that sure is pretty! I wish I had a pile of twine on rolls. LOL Just so I could make this storage frame. But I’m hopelessly cheap. I’ve got to stop buying stamps and dies, so I can have some fun accessories. Keep up the good work. I’m loving these tutorials.
That is so creative and darn cute. What a great idea!!
By the way great instructions too!
What a lovely way to store twine – you are so creative! I love that it was inexpensive too!
My organizational need? I have become quite the punch-a-holic so I need a better way to store punches. Currently they are laying in drawers where I can see each one (not stacked) but that is beginning to take up a lot of drawer space. I have started a binder with pages showing which punches I have so I can easily look through them to see the different designs when I want to create a border or something.
What an awesome project! Your directions are fabulous!
Jawdropping!
It’s beautiful and so clever of you! Thanks for showing us how.
Absolutely brilliant 🙂
So who won the Fiskars Fuse? I would live to see how you organize your punches and bigger tools
This is so awesome and beautiful! Amber,you are one truly innovative and talented crafter! You are my biggest inspiration in the blog world of crafting! 🙂 I’ve been following your blog for over a year now and you inspired me to start my on blog about card making just recently. So, THANK YOU! I look forward to see more of your organizational ideas. Hugs, from a “cardmaking junkie” (that’s what my husband calls me!) from Sweden 🙂
This idea is absolutely genius!! I’m going to see what I can come up with to make my own. Thanks
Amber, this is totally awesome. Appreciate you sharing all the details. Of course if I make one, then I need to buy spools because right now I’ve just been using twine samplers. : ) TFS!
I have seen that frame in Michaels. Never thought it could be used for nothing more than a frame …You are so crafty.
First time I have visited your blog and glad I did. Lots of great ideas here. Thanks for sharing!
Fantastic idea! I don’t have full spools of bakers twine but this is both beautiful and practical!
oh good gawd. i gotta make this.
When I initially commented I clicked the “Notify me when new comments are added” checkbox
and now each time a comment is added I get three emails with the same comment.
Is there any way you can remove people from that service?
Thanks a lot!
Unfortunately, I do not have access to this service so I’m unable to keep you from receiving the notification